Anyway, one of the most ubiquitous bolt-ons is the intake. It usually makes the engine a little bit noisier, the engine bay a little bit cooler-looking and on most modern engines, adds very little power. That's pretty much why I didn't put one on for my first year of running STX. Instead, I put together an exhaust that makes the car MUCH noisier, and adds a tiny bit of power. Good choice, right?
From a little bit of research, it looks like AEM's intake system nets the greatest power gains of any intake on the market. I have no idea why, because they're all basically a tube with a filter at the end. The AEM (also sold as a Mazdaspeed intake) snakes behind the front bumper support to put the filter right in the RX-8's huge grille opening. This is actually not STX legal because it requires the removal of a piece of plastic that is technically part of the cooling system, so a lot of STX RX-8 (and STR MX-5) owners have re-routed their AEM intakes to place the filter just above the bumper support, hidden by the bumper cover. This requires buying more stuff on top of the $325 purchase price of the AEM system.
 Here's an example of a modified AEM intake on an MX-5
I figured I could build my own a little cheaper, so I ordered the following things:
1. 2' Mandrel Bent Aluminum 45° Bend, 3.5"
2. 2' Mandrel Bent Aluminum 90° Bend, 3.5"
3. 3.5" Silicone Hump Hose, Black
4. Silicone Reducer, 3.5" to 3.0"
5. AEM DryFlow Air Filter 21-2047DK
6. A bunch of hose clamps
I actually ordered more stuff but ended up not needing it.
First, I pulled the MAF off of the existing intake and measured it so I could reproduce its mount in aluminum.
 Then, I realized that people just sell these things for $13!
I stripped the old intake off the car, and started shoving stuff into place:
 Step 1: Remove everything. And yes, I know it's really dirty in there.
 Step 2: Jam filter between core support and bumper beam
 Step 1: Remove everything. And yes, I know it's really dirty in there.
 Step 2: Jam filter between core support and bumper beam
And Step 3: Connect the dots. That was the time-consuming part. I actually got away with just cutting up the 45 degree bent tube into two pieces and welding it back together in a different orientation.
 Step 4: Stick these things together
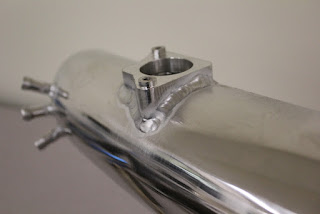 I'm still figuring out this aluminum welding thing
 Step 4: Stick these things together
 I'm still figuring out this aluminum welding thing
Step 5: Bolt it all together and now I have a sweet looking intake!
 It's sweet looking if you ignore that one rusty hose clamp
 It's sweet looking if you ignore that one rusty hose clamp
I weighed all the crap I took off at 12.124 lbs (it was a needlessly precise scale), and all the new stuff weighed in at 4.848 lbs, for a total weight savings of about 7.25 lbs. I can't tell a difference in power, and I really don't notice any difference in noise due to my ridiculously loud exhaust. All in all, I'm not sure that it was worth the $150, but it looks pretty nice and it was fun to build.
Next installment will be the battery. You can see in the photos that I already got a little one, but it's mounted really poorly. That should be taken care of within the next week.
Next installment will be the battery. You can see in the photos that I already got a little one, but it's mounted really poorly. That should be taken care of within the next week.
No comments:
Post a Comment