A lot has happened on the Starlet since I introduced it like a year ago, but not really as much as I'd like. During the autocross season, I don't really get much done, so now that that's over, I've been digging into it a little more. I'll get to a major-ish update later, but since I just built up the rear axle, I'll post about that now.
The Starlet comes with a solid axle utilizing a tiny little 6" ring gear and it's held on with a triangulated four-link suspension. This is the same kind of suspension as the "quadra-link" that was used on Mustangs up until the S197 was introduced in 2005. Unfortunately, it is also not-so-affectionately known as "quadrabind" because it demands a lot of deflection from its bushings in both roll and ride motions, so stiffness would increase significantly with suspension travel, causing all kinds of dumb handling problems. The Starlet is no different, except that it's an economy car so nobody cares.
Well, I care. So part of the plan for this car is to basically scrap the rear suspension in favor of a different design. Incidentally, I'm following what Ford did with the Mustang and replacing the four-link with a 3-link and a Panhard bar. While I'm at it, I'm also changing out the dinky little Toyota axle for something that won't explode when subjected to more than the 60 hp that it was designed for.
I ended up deciding on an axle from an '84-'85 Mazda RX-7 GSL-SE for a few reasons: It can handle a decent amount of power, it's not as heavy as common axles like a Ford 8.8, a GM 10-bolt or a Toyota 8", and it's a lot easier to find than an AE86 axle. There are other little factors like the fact that it shares a bolt pattern with the Starlet and comes with a nice clutch-type diff from the factory. That's probably true of the AE86 axle as well, but like I said, the RX-7's are a lot more ubiquitous especially in the midwest.
Check it out; a real ramped clutch-type diff!
I ended up finding a local guy parting out a GSL-SE, so I was able to just drive a few miles, stuff it in the back of my Fit and bring it home for a very reasonable price. It just sorta sat under my bench in the garage for a while, but I just recently took it out and slid it under the car to see what it looks like. It turns out it's waaay too wide, as it's about 5" wider from hub face to hub face, so on top of having to cut off all the brackets and weld on new ones, I also have to narrow the housing and get the axles cut down and re-splined.
So let's get to it. First, I stripped out the diff and axles and ground off all the tabs on the axle housing except for the pair used for mounting the sway bar which I've decided I'll keep for now. This took a long time and turned my garage floor black.
Then, I made all the tabs. Oh, I guess somewhere in here I also designed the suspension. That is surprisingly uninteresting though. Basically, I guessed at target values and saw how close I could get to them in a way that would be somewhat easy to implement. So I picked a super low ride height, decided that I would re-use the lower control arm mounting points and figured out the rest from there.Here are some of the tabs and things. I welded the panhard bar mount together off the axle to make life easier. I also have no confidence in my design, so I put in extra holes to allow for (very) coarse adjustment to things like roll center, anti-squat and roll steer.
These are lower control arm tabs (windowed for lightness!)
This is an adjustable toothy plate for mounting the panhard bar at various heights
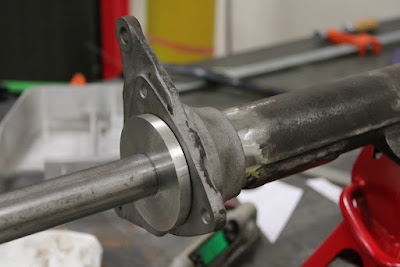
After that, I hit the point of no return when I lopped the ends off of the housing. This is scary because they carry the wheel bearings and need to be nicely aligned to the center housing area, so they're not going back on without some work. I was smart enough to measure the angle of the brake mounting bosses first so at least I could get one thing right when I pieced it all back together.
One of my rare thinking-ahead moments
The final disassembly step was to lop off the extra width on the housing. I decided to take 2.25" off of each side based on some crude measurements that I took with the axle under the car. This was done in a crazy looking way by putting the entire axle housing in a bandsaw.
Can you tell that I love my digital angle finder?
That was a little scary, but after measuring 19 times and cutting once, it turned out about right. Meanwhile, I smoothed out the faces of the axle ends/bearing carriers on the lathe so I could weld them cleanly to the axle housing.
It wouldn't be one of my updates without a picture of this lathe
While I was on the lathe, I also made some dummy bearings to clamp into the diff carrier as well as to press into the wheel bearing carriers. These dummy bearings all had a matching hole in the middle through which a big straight solid steel shaft was passed through to ensure alignment.
I saw this great tip somewhere of using a factory scissor jack to level out the housing
After measuring another 100 times, I welded the ends on.
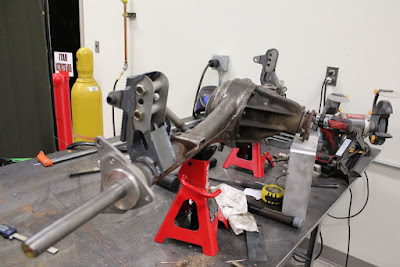
And then I welded on all the suspension tabs.
I made a lot of little plates to box them in too.
The panhard mount also needed some little tubes to give it some lateral stiffness since all of the rear axle's lateral load is transmitted into it.
A giant pain both to miter and to weld
And all of a sudden, a finished axle!
Actually, this took a ridiculously long time
I knocked out the alignment rod...and oh wait, the axle is super crooked!
For reference, the yellow end of the rod should be in the middle of that hole...
I was a little alarmed because I don't have the heavy equipment normally used to straighten axle housings. That usually consists of a gigantic I-beam, some big chains, a bottle jack and an oxyacetylene torch. Well, I guess I had a bottle jack in my truck, but those other things are important too. I had also heard of using an OA torch to heat up part of the housing and then quenching it with water to shrink that area and pull the axle straight. I liked this idea, but again, no OA torch. So I instead used the TIG welder torch to strike up an arc on the housing. Wandering the torch around a bit was enough to get a decent chunk of the housing cherry red.
And then a quick quench with a wet rag.
This is a boring looking photo
A few iterations of this on each side, and I was able to slide the alignment rod in and out by hand. And there you have it, a narrowed and custom tabbed RX-7 axle housing.
I unfortunately can't cut splines on the halfshafts, so those will be sent to Dutchman Motorsports to get shortened. Then, with some work on the chassis end, and some money sunk into decent shocks, I should be able to bolt this thing up and have some rear suspension!


