ICEngineering Subjects

Monday, December 17, 2012

Project Starlet: Rear Axle Build-Up


 A lot has happened on the Starlet since I introduced it like a year ago, but not really as much as I'd like. During the autocross season, I don't really get much done, so now that that's over, I've been digging into it a little more. I'll get to a major-ish update later, but since I just built up the rear axle, I'll post about that now.

The Starlet comes with a solid axle utilizing a tiny little 6" ring gear and it's held on with a triangulated four-link suspension. This is the same kind of suspension as the "quadra-link" that was used on Mustangs up until the S197 was introduced in 2005. Unfortunately, it is also not-so-affectionately known as "quadrabind" because it demands a lot of deflection from its bushings in both roll and ride motions, so stiffness would increase significantly with suspension travel, causing all kinds of dumb handling problems. The Starlet is no different, except that it's an economy car so nobody cares.

Well, I care. So part of the plan for this car is to basically scrap the rear suspension in favor of a different design. Incidentally, I'm following what Ford did with the Mustang and replacing the four-link with a 3-link and a Panhard bar. While I'm at it, I'm also changing out the dinky little Toyota axle for something that won't explode when subjected to more than the 60 hp that it was designed for.

I ended up deciding on an axle from an '84-'85 Mazda RX-7 GSL-SE for a few reasons: It can handle a decent amount of power, it's not as heavy as common axles like a Ford 8.8, a GM 10-bolt or a Toyota 8", and it's a lot easier to find than an AE86 axle. There are other little factors like the fact that it shares a bolt pattern with the Starlet and comes with a nice clutch-type diff from the factory. That's probably true of the AE86 axle as well, but like I said, the RX-7's are a lot more ubiquitous especially in the midwest.

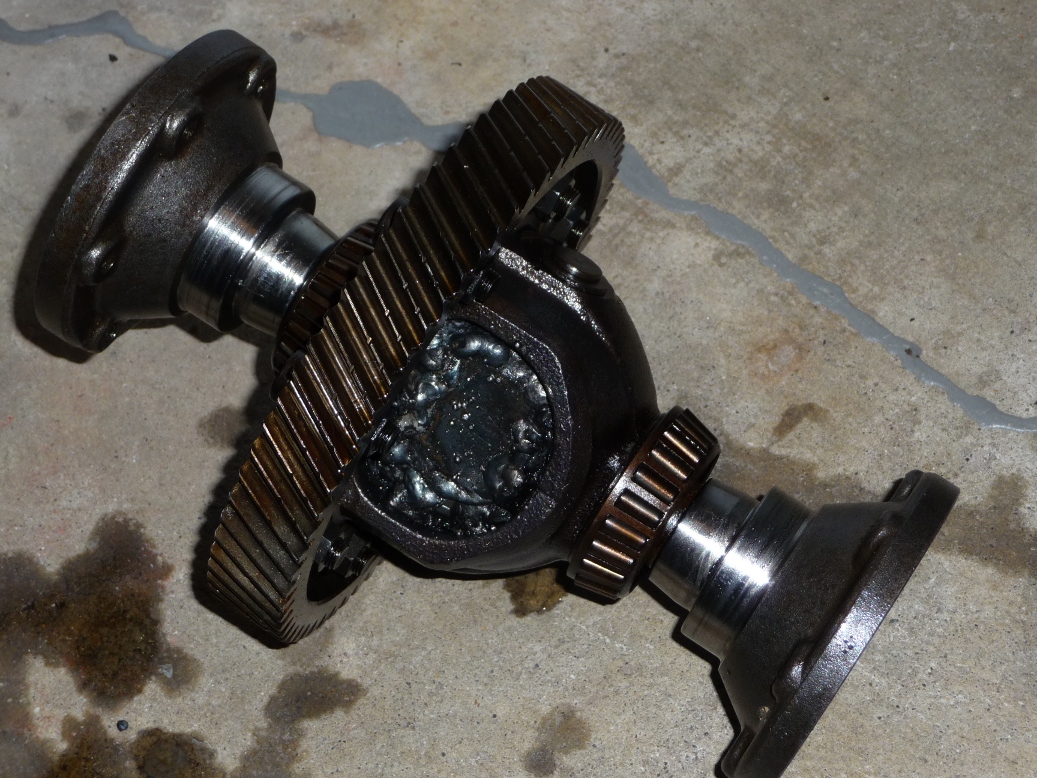
Check it out; a real ramped clutch-type diff!

I ended up finding a local guy parting out a GSL-SE, so I was able to just drive a few miles, stuff it in the back of my Fit and bring it home for a very reasonable price. It just sorta sat under my bench in the garage for a while, but I just recently took it out and slid it under the car to see what it looks like. It turns out it's waaay too wide, as it's about 5" wider from hub face to hub face, so on top of having to cut off all the brackets and weld on new ones, I also have to narrow the housing and get the axles cut down and re-splined.

So let's get to it. First, I stripped out the diff and axles and ground off all the tabs on the axle housing except for the pair used for mounting the sway bar which I've decided I'll keep for now. This took a long time and turned my garage floor black.


Then, I made all the tabs. Oh, I guess somewhere in here I also designed the suspension. That is surprisingly uninteresting though. Basically, I guessed at target values and saw how close I could get to them in a way that would be somewhat easy to implement. So I picked a super low ride height, decided that I would re-use the lower control arm mounting points and figured out the rest from there.Here are some of the tabs and things. I welded the panhard bar mount together off the axle to make life easier. I also have no confidence in my design, so I put in extra holes to allow for (very) coarse adjustment to things like roll center, anti-squat and roll steer.

These are lower control arm tabs (windowed for lightness!)

This is an adjustable toothy plate for mounting the panhard bar at various heights

After that, I hit the point of no return when I lopped the ends off of the housing. This is scary because they carry the wheel bearings and need to be nicely aligned to the center housing area, so they're not going back on without some work. I was smart enough to measure the angle of the brake mounting bosses first so at least I could get one thing right when I pieced it all back together.

One of my rare thinking-ahead moments

The final disassembly step was to lop off the extra width on the housing. I decided to take 2.25" off of each side based on some crude measurements that I took with the axle under the car. This was done in a crazy looking way by putting the entire axle housing in a bandsaw.

Can you tell that I love my digital angle finder?

That was a little scary, but after measuring 19 times and cutting once, it turned out about right. Meanwhile, I smoothed out the faces of the axle ends/bearing carriers on the lathe so I could weld them cleanly to the axle housing.

It wouldn't be one of my updates without a picture of this lathe

While I was on the lathe, I also made some dummy bearings to clamp into the diff carrier as well as to press into the wheel bearing carriers. These dummy bearings all had a matching hole in the middle through which a big straight solid steel shaft was passed through to ensure alignment.

I saw this great tip somewhere of using a factory scissor jack to level out the housing

After measuring another 100 times, I welded the ends on.


And then I welded on all the suspension tabs.


I made a lot of little plates to box them in too.

  
The panhard mount also needed some little tubes to give it some lateral stiffness since all of the rear axle's lateral load is transmitted into it.

A giant pain both to miter and to weld

And all of a sudden, a finished axle!

Actually, this took a ridiculously long time

I knocked out the alignment rod...and oh wait, the axle is super crooked!

For reference, the yellow end of the rod should be in the middle of that hole...

I was a little alarmed because I don't have the heavy equipment normally used to straighten axle housings. That usually consists of a gigantic I-beam, some big chains, a bottle jack and an oxyacetylene torch. Well, I guess I had a bottle jack in my truck, but those other things are important too. I had also heard of using an OA torch to heat up part of the housing and then quenching it with water to shrink that area and pull the axle straight. I liked this idea, but again, no OA torch. So I instead used the TIG welder torch to strike up an arc on the housing. Wandering the torch around a bit was enough to get a decent chunk of the housing cherry red.


And then a quick quench with a wet rag.

   This is a boring looking photo

A few iterations of this on each side, and I was able to slide the alignment rod in and out by hand. And there you have it, a narrowed and custom tabbed RX-7 axle housing.


I unfortunately can't cut splines on the halfshafts, so those will be sent to Dutchman Motorsports to get shortened. Then, with some work on the chassis end, and some money sunk into decent shocks, I should be able to bolt this thing up and have some rear suspension!

Thursday, November 29, 2012

STX RX-8: 2012 Season Overview


Long absence as I don’t really have the attention span to do more than one thing at a time. I’ve been concentrating pretty hard on autocrossing this season without much time to do anything else.

Last winter, I did a bunch of work with very poor hours-of-labor to seconds-on-course ratios.
First was dropping the rear subframe to replace the bushings with UHMW polyethylene. This should reduce subframe movement which probably causes understeer-inducing toe change under load. The STX rules don’t allow metal, so acetal (delrin) or UHMW are about as good as it gets. UHMW is really cheap, and its suitability for subframe bushings is about the same as delrin so that’s what I went with. Both are ridiculously easy to machine:


The worst part of this task is definitely dealing with the subframe when all of your fasteners are rusty from having been too careless with the car in crappy conditions. I could also use a transmission jack or something a little bigger (or another person I guess):


I burned/sawed out the old bushings, pressed in the new ones and gave the subframe a good cleaning and a new coat of paint:


Bolting that back up was approximately equal in pain-in-the-ass-ness to removing it, but at least everything was clean.

Next on the list was spherical bearings at the ends of the dampers. The RX-8's dampers (like just about every other production car's) are mounted on squishy rubber bushings for good NVH. However, they do lots of twisting and pivoting around to keep from bending the damper, so I wanted to replace them with spherical bearings with no slop and less friction. While I was at it, I also modified my spring perches so that I could lower the car more. Of course I'm still using my dirt cheap Koni Yellow dampers that I've had for the last 5 years, so the sphericals cost about 1/3 of what the dampers cost. I'm still not sure what I think of that fact.

The rear shock bushings need to do a lot more twisting and bending than the fronts because of how they're mounted, so I did those first. And then the season started and I never really got around to doing the fronts. Oops. First, I made a carrier sleeve to weld into the lower shock eye that would take the spherical bearing and a retaining ring to hold it in:


You can see in that picture how I have my coilover spring perches sitting as low as they'll go, so I cut off the factory spring perch to leave a little lip and bored a step into the coilover sleeve so it could slide down lower but still be retained by that lip. I also welded in that spherical housing:


I did the same thing up front with the spring perches. However, the lower mount of the front shock has a clevis that attaches to a bushing in the control arm, so I'm unsure of the legality of replacing that with a spherical.

Up top, I lopped off the top of the shock mount and welded in another spherical housing, this time with a bolted plate to retain the bearing. I see now that I don't have pictures of that...it's not very interesting anyway.

The last thing I had planned was a new exhaust. I knew of a local guy (Brian McNamara) running an aluminum exhaust on his FSP Civic, and I thought that might be a good fit for me because it's light and aluminum is a lot cheaper than stainless steel. I also planned to package more than one muffler, hoping that would make it quieter than my current single straight-through Borla setup (it's definitely louder). So I bought a pair of Vibrant aluminum mufflers and a bunch of bends and tubing, meanwhile convincing friend and local STX competitor Eric Shin to do the same on his WRX Wagon. We built his first because it was a heck of a lot easier:

This one weighs about 7 lbs

Mine was complicated because it needed to go through two holes in the bumper and package two mufflers. We were up pretty late getting this thing finished up:

Mine was 11 lbs

Eric's exhaust worked awesome with no signs of damage for the entire year except for a slight dent from a stray cone. Unfortunately, the fact that I don't have any heat-extracting turbocharging devices in my exhaust stream coupled with the fact that rotaries have pretty extreme exhaust temperatures to begin with meant that mine ended up cracking and falling off while autocrossing in Nebraska. That made for a long, loud drive home. I ended up reattaching the old Borla single-exit exhaust to use for the rest of the season.

Those were the winter projects. When the season finally started, the car was AWFUL! I was kept up at night during the week between events worrying about how I could possibly run a national-ish campaign with the car being so terrible. It was extremely sensitive to throttle inputs and would start sliding uncontrollably on every corner exit. I changed everything; spring rates, damping, new sway bars, ride heights, tire pressures, toe, camber...everything. But the car was suspiciously unaffected. I started looking for bind; I used a load cell to measure linearity of force to travel due to bushing compliance and to see where I contacted the bumpstops and how non-linear they were and I couldn't find anything. It was amazingly frustrating. 

Eventually, the new Hankook tires that my co-driver had ordered came in (they were on back-order) one week before we were to go to Lincoln for "Spring Nationals" and everything was fixed! In fact, it was really dumb of me to not just try new tires at some point. We didn't know that it was all better until we got to Lincoln though, so it was a crazy risk to take. The car was suddenly just incredible. I got my second ever national trophy at the Lincoln National Tour, but the greatest reward was the relief that I felt that I wasn't just unbelievably awful at putting a car together.

Following that fiasco, this was by far the best autocross season that I've had. I had a great competitive STX class to run with back at home, and I was regularly winning the class and achieving top 10 indexed results, right in the mix with some of the best drivers in the region:


Then, something totally unexpected happened. In July, I went into the Toledo Pro Solo hoping to trophy in the biggest class at the event, but somehow I managed to actually win it outright! After my winning set of runs, I got out of the car and almost fell over because I just couldn't believe it.


I went on to take 2nd in the Peru National Tour just one week later, which confirmed to me that the car was awesome and incredibly easy for me to drive fast. I was really excited for Nationals.

However, Nationals didn't go quite as well. My tires were looking almost like slicks by the time September rolled around, but anecdotal evidence about the Hankooks indicated that they are good until they cord, so I just left them. That was definitely a mistake. They had enough life to get me 3rd place in the Pro Solo Finale, though their breakaway characteristics had definitely gotten less predictable so I was sitting on one incredible left-side run and a downright terrible right-side run.

For the National Championship, the car had become very difficult to drive. It was great for the first run only, so both I and my co-driver ended up way at the back of the pack. A huge letdown for the end of a great season.

The one good thing that came out of that week in Lincoln was that my 3rd place finish in the Pro Solo Finale netted me a 2nd place overall in the season points for Pro Solo. Good for a nice trophy and a bunch of contingency money from Mazda.

Well, if that isn't just the worst photo ever...
 
I wrapped up the season with just a few local events, including a drive in my co-driver's new BR-Z on Hoosiers the weekend after Nationals (it's great in case you're wondering).

Overall, the season was not perfect but it was MUCH better than expected (trophies in 4 of 6 national events attended), and I learned a lot of things so I'm really looking forward to next season. I'm also looking forward to a break from racing over the winter so look for some progress on the Starlet in the coming months. I'll also be making some major improvements to the RX-8, so maybe I'll update on those things in smaller and more frequent posts.

Saturday, November 24, 2012

Civic Cat Introduction

That's a 1990 Civic DX, and a '97 Arctic Cat Thundercat 900.  By combining the two, I hope to build the first SCCA Rallycross M2 car to the extent of the rules that I know of.  I'm sure at this point some other people somewhere are working on similar projects.

At first glance, this may seem like a bad idea.  But hear me out:
Project Goals
1) Build a vehicle significantly (~1sec/40 second course) faster than current M2 competitor cars
2) Win M2 class at rallycross nationals
3) Do this for under $3000
4) Possible $2014 challenge car (but I haven't actually read those rules yet)

Target Specs:
a) 1500lbs with me sitting in it
b) 160hp, available (after drivetrain ineffeciencies) from 20-60mph with CVT
c) ... frt/rear weight distribution (Still deciding - thinking 60/40)

Current condition:

Current plan:
-9:1 reduction after CVT secondary accomplished with two differentials (sealing, durability).  
-2nd differential, between front wheels, will be limited slip
-Extensively modified subframe to support new drivetrain
-Complete stripping of Civic - no interior, dash, engine, trans, electrical, fuel tank+pump, doors, rear glass, rear hatch, bumpers, trim, wipers, hvac, functional passenger door, etc....
-Use snomobile wire harness (~3 wires, awesome), pull start, mikuni fuel pump+3 gallon cell, no-assist brakes.  Will have enough amperage to run illuminated gauges, brake light, and 2 HID's forward with snomobile generator
-13" wheels, autograss racing tires
-May require roll hoop, or bars for belts pending investigating door and stock belt construction
-Fabricated 2-stroke expansion chambers (3x)
-AN brake lines run in car, 50/50 frt/rear before rear brake bias adjuster.  Rear drums OK

I have multiple ideas for engine and CVT layouts which should package, one which mounts the engine in the passenger seat area.  All layouts will require elimination of passenger seat area at least to package the 3 large expansion pipes.  Too bad nobody will be able to ride along!

The stock car should weigh about 2000lbs.  Replacing the stock engine and trans should save over 100lbs right off the bat...is there another 500lbs to be removed? I will corner weigh the shell when fully stripped to decide on engine and trans layout.  I will plan on testing with floor-mounted ballast to consider vehicle weight vs CG advantages, and hope to learn what's fastest.  I could potentially run ballast on some events, and none in others after seeing what sort of risk there is of traction rolling.

So how heavy will it actually be?  Will a CVT respond quickly enough and will the car actually be fast?  Will I be able to spin the tires through 30mph like I hope? Have I forgotten things I should consider (like cutting brakes...)?

Saturday, September 1, 2012

Transmission Transitions wrap up

Thought I'd finish this one up because I think people would be interested in how one could weld a diff, and how it affected the car!


warning... welding a diff at all, or doing it this way, may not be the best solution.  But it was fun, and effective in sno-drift.

About a year ago I had taken the trans apart to get to the differential, in order to weld it (turn it into a cheap and very heavy spool type).  Unfortunately, most transverse engine transmissions require a complete disassembly to get to the differential.  In this case, the differential is pretty much the LAST component to remove if you were to make the list.

This was a 'rally' build.  Importantly (to me), if you just take it apart, and put the same parts back in, there's no need to worry about shimming anything to get the preload correct, it should all go back together 'rally' functional if that's how it came apart...  and it did.


First: disassembly.  Matt of Bentmettle helped (and supplied the odd torx I didn't have)  Ripped it apart in 30minutes, and I'm thinking 'ooooh no slow down' pretty much the whole time.

Then it sat for...maybe 2 months.  But then!  Welding time - - the one thing I didn't want was for the welding job to fail, and take out the transmission with it.  Of course, as long as the differential is stronger than the halfshafts it should be good.  But I really didn't want the diff to fail.

After cleaning as well as I could (pretty poorly) I preheated it...on my old grill.


Got it up towards 450degrees and then went at it with a Hobart Handler 120 on max and flux core wire.  I welded the spider gears together, and then used small squares of .25" steel to fill in the gaps, and welded the spider gears to those too.  I had plenty of penetration. (hehe...)


Notice that I even left the bearings on...  certainly not best practice, but it was effective.  I took care to keep the gear but especially the bearing surfaces covered while I was welding to keep them clean.  They certainly picked up some heat discoloration though.  I really didn't want to have to set bearing preload in this thing...

Finally, I put the trans back together.  Used all the old synchros and even most of the old seals.  I think I only replaced the output shaft seals, case gaskets, and some of the shift lever seals, but I forget the details.  I think it took... two 3hr sessions.  It was my first ever trans reassembly, and I learned a lot about how a manual transmission works while doing it.  I thought I already knew, but some details, like what really engages the synchros (spring tension working on a ramp, not shift lever effort...) I had no idea.


Thinking back it was interesting to note that the reverse gear was chewed up on the edge from previous owner not adjusting the shift linkage and then not correcting it, but more interesting was that the pinion has somehow lost a small chunk of one of its teeth!  Maybe a piece of metal from the chipping reverse gear got in it.  But judged both minor, and it did turn out that the trans was fine.


So how'd a FWD with a spool drive?
A little different than I expected.  In that, at normal speeds, it does NOT feel like a limited slip.  Going around corners of any kind, even with power steering, takes serious steering effort.  Much more pronounced than anybody could ever complain about even with a tight and chattery clutch-type diff.  The tire traction and scrub just wants to pull the wheel straight, and you can feel the tires grinding.  Corner radius depends on inside-vs-outside tire traction, and which one 'wins' the battle it's in with the other one.

And then when you're heading straight, under power, and with variable traction, the car is all over the place!  When one wheel has more traction than the other it kicks back through the wheel.  But even if you hold the wheel straight, it'll still drive the car to the other direction.

First we rallycrossed the car, and it was pretty terrible.  All tight corners, the front end would grind and scrub and push...  definitely made the car a much worse rallycross car.

And in sno-drift, it was difficult to turn and pick line the same...until going sideways at speed, then you could really pull the car through with the throttle.

But maybe most importantly for this event, we never got stuck!  Which is a lame problem to have, but most 2WD cars had it.  Between siped altimax arctics, and the welded diff, I didn't even know that the rest of the field had some serious hill climbing touble.  For us, it wasn't a problem.


So I guess the welded diff was a success.  Through other means however (tree), it seems we've toasted the trans.  I'm not heartbroken, I'll put the spare, open diff 020 back in for now, then later maybe a limited slip in the 02J.

Sunday, July 1, 2012

Mind the gap

Excuse us for the lack of communication, we have much to update!  We ran quickly at Sno*Drift, but were frustrated early on by a tree.  So we're repairing, we can build it stronger, better, faster... We'll be back with the full story, and we'll be back in a stage rally soon.

And we've also been recreating.  This summer for both of us has involved a lot of full weekends, not often in direct rally preparation, but often amateur motorsports related.  Or biking, camping, motorcycling, rusty truck fixing, wedding attending, grand prix spectating...you get the idea.

Regarding the amateur motorsports - Kenneth is busy preparing his STX RX-8 and practicing for his second visit to Autocross Nationals, and I am learning how to be competitive in my 125cc shifter kart. See below for my current karting condition, video from yesterday at a small kart track in Lansing, MI. I still have a long way to go, specifically, I need to get around that track 2 seconds quicker. I have some ideas.


Coming up soon: rally storytelling, fabrication and repair explanation and pictures, and future plans. Also some noncompetition project car updates. Please mind the gap, but stick with us, we're still here.