We are Sean Murphy and Kenneth Tsang. We race cars and build stuff. Here is where we loosely document our adventures.
Friday, May 27, 2011
Domain Name
Ok, last post for today. For our tiny subscriber-ship, you might have noticed that when you came to our blog today, you were redirected to www.icengin.com. That's because we have a domain now, which looks better for vehicle decals than a blogspot address. You can change your bookmarks or whatever you use to keep track of our blog to point to the new address. Or you can not, because it'll always automatically redirect.
More Rally Strut Progress
A few interesting things have happened to Dmitriy's struts since the last update:
First, I finished plating all of them, and got them sent off to Bobby Whiteley for powdercoat. Within a day, he was sending me completed pics!
 Bobby is awesome
 My office has ugly carpet
Note that the inserts have unmachined ends, so I need to cut them to fit the Subaru top mounts. The end is in sight!
First, I finished plating all of them, and got them sent off to Bobby Whiteley for powdercoat. Within a day, he was sending me completed pics!
 Bobby is awesome
Then, I had a big robot finish up the lower spring perches and locking nuts for me.


Lastly, the strut inserts finally arrived from Bilstein!
 Custom parts are neat
 Custom parts are neat
 My office has ugly carpet
Note that the inserts have unmachined ends, so I need to cut them to fit the Subaru top mounts. The end is in sight!
Project Starlet: Introduction
Toward the beginning of 2010, after graduating from grad school, getting a job and moving to a house with a proper garage, I got hungry for a project car of my own. Turns out, I already have a project car; it's a 1983 RX-7 with a Ford 302 swap.
I started on this project waaaay back in 2004 with my good friend, Chris Szutu. It was the summer after our freshman year in college, and for some reason we thought it would be a good idea to get a project car even though we spend most of our lives about 2300 miles apart. We found a non-running RX-7 GSL (that's with 4-wheel disc brakes and LSD) for $300, which included two blown motors. The original not-very-fleshed-out plan was to rebuild one of the motors and get it running. Then maybe we'd sell it or...like I said, not much of a plan. We eventually found both engines to be completely useless as one had been ravaged by a broken apex seal and the other had warped housings due to an overheat.
We went back to school, leaving the car in Chris's parents' driveway, and somehow it remotely escalated into a V8 swap. We ended up as the proud owners of a hideous '88 Mustang GT convertible and proceeded to drop that engine into the RX-7 the next summer.
 Wow, that thing is ugly.
 This was basically the pinnacle of our automotive achievement
That was pretty cool, but just because it's in the car, doesn't mean the car runs. We were too daunted by wiring (and the spiders that live in the car's mirrors) to really tackle it seriously, and so it's really just been sitting. In Chris's parents' driveway. For...5 years now?
This post is titled something about my Starlet, so all this must seem pretty unrelated. Well, just over a year ago, Chris was trying to get the RX-7 out of his parents' driveway like any good son would, but he had no place to put it, so the plan was to ship it out to me. Due to some really shady shippers (partially a result of our own cheap-ass-ness), that fell through. So I had gotten all excited to have a cool project and then it just didn't happen, so I started looking for one.
My introduction to the Toyota Starlet was seeing a couple of really cool looking ones autocrossing in the Bay Area way back in 2002. Apparently, one of the better ones belonged to Tito Solis of Red Star Racing.
 My Inspiration!
 This thing has pushrods?!
This post is titled something about my Starlet, so all this must seem pretty unrelated. Well, just over a year ago, Chris was trying to get the RX-7 out of his parents' driveway like any good son would, but he had no place to put it, so the plan was to ship it out to me. Due to some really shady shippers (partially a result of our own cheap-ass-ness), that fell through. So I had gotten all excited to have a cool project and then it just didn't happen, so I started looking for one.
My introduction to the Toyota Starlet was seeing a couple of really cool looking ones autocrossing in the Bay Area way back in 2002. Apparently, one of the better ones belonged to Tito Solis of Red Star Racing.
 My Inspiration!
Little did I know, Starlets don't look or act anything like that when they're stock. Not. Even. Close. But now that I was starting from scratch, I was determined to get one because they're unique, rear wheel drive and weigh about 1800 lbs. I started searching in earnest, finding that Starlets are ridiculously rare in the Midwest and clean examples are VERY expensive. I finally found a 1981 in Chicago that claimed to be rust-free, had new paint and a 2TC swap with dual Weber DCOE's. I don't know anything about old school Toyota motors or carburetors, so none of that mattered to me. I also made a really strong point to the seller that I was driving a long distance to get the car so I wanted to be reassured that the car wasn't a rustbucket. The lesson that I learned is that people are jerks, because the car is actually pretty rusty. It also ran like crap, so I drove it about 250 miles across Michigan at about 55 mph, with the exhaust backfiring violently if I ever broke that barrier.
 The Starlet is the brown one on the right
 The Starlet is the brown one on the right
 This thing has pushrods?!
Since getting it into my garage almost exactly a year ago now, the car has run a few times just to get it positioned in various directions in the garage so I can cut out the MASSIVE amounts of rust on the car and repair them. So far, I've replaced large chunks of both rockers, both front frame rails where they come under the front floor, and most of the floor.
 The floor looks suspiciously like my garage floor...
 Much better
 What, you don't know what a tiptisserie is?
 The floor looks suspiciously like my garage floor...
 Much better
Once I get the passenger's side floorpan buttoned up, I should be done with most of the rust repair, with only minor stuff up front that is neither structural nor visible. Then, following Dmitriy's lead, I'll probably get the thing up on a tiptisserie to strip and paint the bottom.
 What, you don't know what a tiptisserie is?
I'm moving soon though, so I have to wait until I have my new garage setup before I can pull the motor and suspension to allow it to be supported sideways by plywood.
SO, the long-term plan is something like this:
1. Make car not rusty: Getting there...
2. Engine swap: Current plan is 2.3L Duratec/MZR with turbo + NC MX-5 6-speed. Maybe 240 whp?
3. Full custom front suspension: Decouple sway bar from suspension location, Koni 8611's, really really low
4. Full custom rear suspension: RX-7 rear axle and custom 3-link + panhard or watts link, more Koni dampers
5. Big wheels and tires: It came with 155/80/13's (!), but I have it sitting on 225/45/15's right now. It seems appropriate, but maybe a 275 Hoosier is in its future
6. Race it wherever it fits: One thing that sucks about this car is that it will not fit nicely in any ruleset that I know of. That's ok with me for now though, I'm just having fun building it!
Sunday, May 15, 2011
Zinc Plating Dmitriy's Struts
After what seems like way too much time, I finally got all of Dmitriy's strut housings welded together, so as mentioned in my first post about them, they're now ready for plating. Since the threads cannot be painted or powdercoated because not only would either of those processes add too much material to allow the threads to work, but as soon as it got chipped or scratched (as it would because they're threads), the underlying metal would begin to rust immediately. Zinc plating is different because it's actually a sacrificial layer and will corrode before the base metal around it does, even if it isn't completely covering it. That's why you find this kind of plating on fasteners as well as steel brackets that might be exposed to harsh environments.
I ended up ordering a zinc plating kit from Caswell Plating after reading a lot of positive reviews of their product. The kit comes with all of the chemicals required, some heaters, some buckets and you pretty much just add tons and tons of distilled water.
 This isn't all of it
I did actually have to take a trip to Home Depot to get some other things like muriatic acid and a bucket to keep the acid in and a spray bottle...but it was all pretty inexpensive and readily available stuff. For lack of any better place to do it, I set up all of my buckets and electrical stuff along the wall of my garage on the side of my Starlet that I'm not currently working on. I really need a bigger garage.
 Um...don't worry, I'm a professional
After dipping things here and applying electricity there and spraying stuff, I managed to get the part cleaned and plated with a delicious layer of zinc. Then, it went into a quick blue chromate dip to seal the zinc and improve its corrosion resistance (I don't pretend to understand how chemistry works) and bam! we have this super sweet plated part!
 It's actually a crazy iridescent blue, but the photo doesn't really capture it. I guess that's still my fault.
 It's actually a crazy iridescent blue, but the photo doesn't really capture it. I guess that's still my fault.
You can see in the picture that it has a little bit of plating all the way to the end of the tube, but I rearranged it slightly in the bucket so it only has significant plating maybe an inch into the mounting tab area. Then, there's the less obvious chromate layer which ends just about 1/4" below the end of the threads. It's not terribly important to plate the whole thing because everything but the threads will end up powdercoated.
That was pretty exciting stuff. Now I just need to do it 5 more times and off it will go to the powdercoater while I finish up all the spring perches. It looks like Dmitriy's making some serious progress on the shell, so I hope I'll have these all ready for him when he needs something to bolt knuckles to.
That was pretty exciting stuff. Now I just need to do it 5 more times and off it will go to the powdercoater while I finish up all the spring perches. It looks like Dmitriy's making some serious progress on the shell, so I hope I'll have these all ready for him when he needs something to bolt knuckles to.
Friday, April 22, 2011
Doin' Stuff
Well, been out of town many weekends, and was keeping the car together for that Marshall rallycross (what a nice day that was!) but with some time available I've finally been able to do some heavy lifting on the car. Of course, actually doing the work is a lot harder than just recounting the list...but:
1) Removed dash (clearly for the first time ever! previous owner had left it in when building cage...) and cut out the embarrassing door bars

2) Bent and fit tubes for dash bar and new door bars. Wow, metal prices are high now. Also, there's little more satisfying than bending tubes accurate to within a degree with a manual bender. Thank you Matt of Bentmettle for drinking beers and leashing ducks for a day! (and helping me fit tubes a bit).
 > $200, but can be shaped into awesome not-kidney-impaling-in-crash door bars and a dash bar (dash done now, only door gussets t0 do). I am really happy with the way they're fit - difficult to tell, but the tubes are offset bent, not intersecting, and are welded together along 6inches under the gusset.

So my workspace is great, but I was still driving the car around with no dash to bend and fit tubes, and later to take advantage of Kenneth's available TIG welder (and awesome welding). It got to a point where I was getting concerned about the amount of gas in the tank, I didn't have any gauges. Pretty fun to drive a car like that though, and to really get the full effect of a simple machine, in this case with a small exhaust leak, so the effect I got was of a ride-on lawnmower...
Unfortunately, I also didn't have gauges to tell me that the alternator was fried. So on my way to work last monday, where I was going to finish welding that afternoon at Kenneth's, the car ran out of electricity. I called Matt with the biggest favor of my life at 8:15am, in the snow (yes, we're in Michigan.) And he saved my ass off the side of the highway. That night, driving home on a charged battery I felt the 'range anxiety' of an electric car! But that medium-sized AGM battery shown in the other posts was a champ, running my car AND headlights for a 10+ mile, 15+ minute drive without apparently struggling at all. I think that the alternator froze during the rear suspension change at snowdrift and then the battery powered it for 15miles of a 20 mile transit that night as well. So very happy with the battery, and the size choice greater than necessary than just starting the car.
And now I'm digging a hole for the best. The engine's coming out.
Rally Ready List:
1) Clean wiring (two words but big ongoing job, hooray weatherpack connectors)
2) Machine strut top plates with additional caster (camber done at the knuckles with eccentric bolts) and spherical bearings, weld to strut tops and cage for reinforce and fix my surprisingly round stock strut tops
3) Rebuild (clean and seals, no revalve) front Bilstein inverted struts
4) Get necessary gauges (obtaining used Audi gauges, VDO oil pressure, oil temp and voltmeter)
5) Set up 9A 2.0L with good clutch and gauge senders, inspect and pull pan, install metal baffle plate. Fix up engine wiring harness, put the best parts from 3 CIS-E systems together for fueling... Get new coolant hoses as necessary
6) Install 2L, install header (beautiful supersprint 4-2-1 stainless, 16 years old used)
7) Install 2002 china-market Chery mechanical HVAC heater core and flapper unit (awesome find, thanks Matt!) to fix heat and also eliminate vacuum lines to the cabin
7) Plumb and run 2L! Please work...
8) Reassemble dash with new gauges
8) Fabricate exhaust header back, with cat at rear in place of muffler
9) Button up car, reassemble and race with 2x current torque under 5000rpm (that's the plan...)
10) Paint & graphics?
So it's a lot to do. Transmission work is notably absent, so open-diff (got a great turn-in!) for now. Gripper differential will be ordered soon, but it's got a 6-week lead time. The trans can be dropped later, and without affecting engine (will be the 3rd transverse motor car I've done THAT on) for diff and final drive. Hm. Exciting.

 > $200, but can be shaped into awesome not-kidney-impaling-in-crash door bars and a dash bar (dash done now, only door gussets t0 do). I am really happy with the way they're fit - difficult to tell, but the tubes are offset bent, not intersecting, and are welded together along 6inches under the gusset.
So my workspace is great, but I was still driving the car around with no dash to bend and fit tubes, and later to take advantage of Kenneth's available TIG welder (and awesome welding). It got to a point where I was getting concerned about the amount of gas in the tank, I didn't have any gauges. Pretty fun to drive a car like that though, and to really get the full effect of a simple machine, in this case with a small exhaust leak, so the effect I got was of a ride-on lawnmower...
Unfortunately, I also didn't have gauges to tell me that the alternator was fried. So on my way to work last monday, where I was going to finish welding that afternoon at Kenneth's, the car ran out of electricity. I called Matt with the biggest favor of my life at 8:15am, in the snow (yes, we're in Michigan.) And he saved my ass off the side of the highway. That night, driving home on a charged battery I felt the 'range anxiety' of an electric car! But that medium-sized AGM battery shown in the other posts was a champ, running my car AND headlights for a 10+ mile, 15+ minute drive without apparently struggling at all. I think that the alternator froze during the rear suspension change at snowdrift and then the battery powered it for 15miles of a 20 mile transit that night as well. So very happy with the battery, and the size choice greater than necessary than just starting the car.
And now I'm digging a hole for the best. The engine's coming out.
Rally Ready List:
1) Clean wiring (two words but big ongoing job, hooray weatherpack connectors)
2) Machine strut top plates with additional caster (camber done at the knuckles with eccentric bolts) and spherical bearings, weld to strut tops and cage for reinforce and fix my surprisingly round stock strut tops
3) Rebuild (clean and seals, no revalve) front Bilstein inverted struts
4) Get necessary gauges (obtaining used Audi gauges, VDO oil pressure, oil temp and voltmeter)
5) Set up 9A 2.0L with good clutch and gauge senders, inspect and pull pan, install metal baffle plate. Fix up engine wiring harness, put the best parts from 3 CIS-E systems together for fueling... Get new coolant hoses as necessary
6) Install 2L, install header (beautiful supersprint 4-2-1 stainless, 16 years old used)
7) Install 2002 china-market Chery mechanical HVAC heater core and flapper unit (awesome find, thanks Matt!) to fix heat and also eliminate vacuum lines to the cabin
7) Plumb and run 2L! Please work...
8) Reassemble dash with new gauges
8) Fabricate exhaust header back, with cat at rear in place of muffler
9) Button up car, reassemble and race with 2x current torque under 5000rpm (that's the plan...)
10) Paint & graphics?
So it's a lot to do. Transmission work is notably absent, so open-diff (got a great turn-in!) for now. Gripper differential will be ordered soon, but it's got a 6-week lead time. The trans can be dropped later, and without affecting engine (will be the 3rd transverse motor car I've done THAT on) for diff and final drive. Hm. Exciting.

Saturday, April 2, 2011
Dmitriy's Rally Struts
A couple months ago, Dmitriy (who has been mentioned elsewhere as one of our indispensable crew members) asked me if I could put together some rally struts for his FWD Impreza that he is building to run in RallyCar's G2 class (alongside/against Sean and me). I thought about it for a few weeks and surveyed the equipment that I had available to me, and decided that I could pull it off.
The first step was obtaining some dampers. I dug through catalogs of a few damper manufacturers, and found that Bilstein was probably going to be our best bet for rally durability, customizability and price (Bilstein was sort of the plan from the beginning, but I figured I should at least do the legwork). I told Sean what our damper requirements were and set him loose on finding something that matches. After several weeks of phone calls and e-mails, we finally found somebody who didn't think we were totally nuts when we asked about custom valved inverted strut inserts. I think that may have been the hardest part of this project, so I'm glad Sean took care of it.
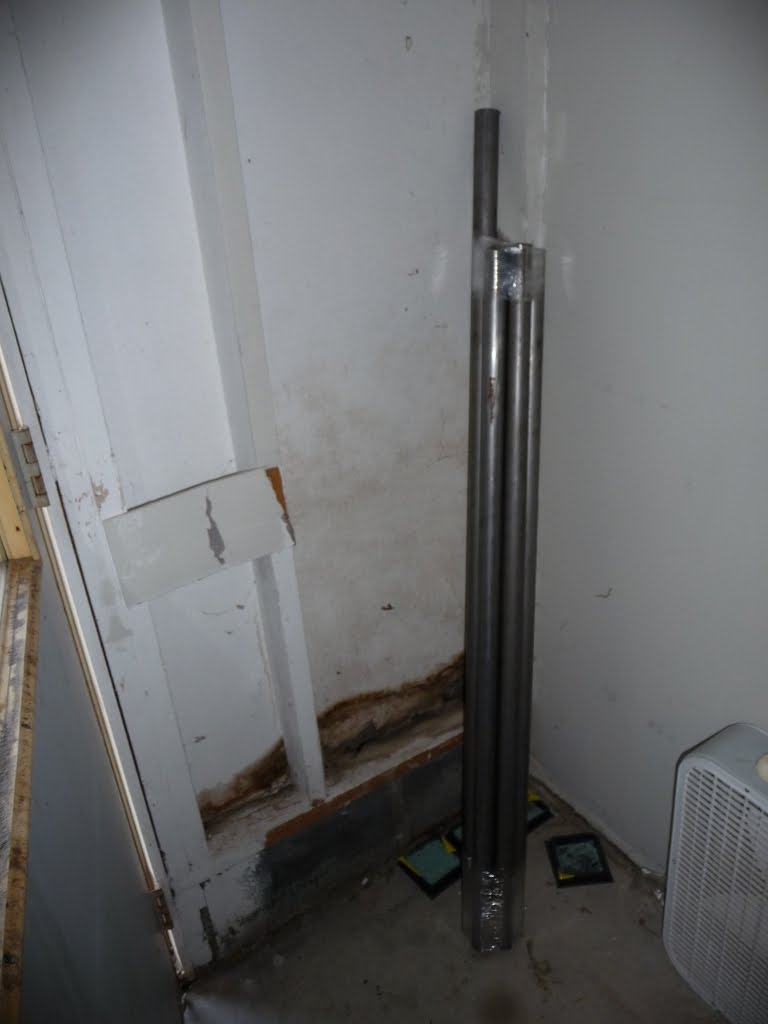
Meanwhile, I took a bunch of parts from Dmitriy to measure and put into CAD so that I could ensure that the new struts would fit. I got something like this:
 Left is stock and Right is...not
 Tada!
Tada!
I've also been making spring perches in a HUGE vertical machining center because it removes material much faster than the lathe does and it does it with one press of a button. They still need to be finished up on the lathe though.

The exciting news is that I just finished up the first strut tube today. The next steps are to plate it so the threads have some protection, and then send it off to powdercoat. Of course I'll wait until all of them are done to do that, but that should happen very very soon.

So that's where I'm at now. I'll update as progress is made, but for the most part it's just duplicating parts so it's not terribly exciting. Meanwhile, check out Dmitriy's build over on SpecialStage (I think it exists in a few other places too, but that's where I keep track of it).
The first step was obtaining some dampers. I dug through catalogs of a few damper manufacturers, and found that Bilstein was probably going to be our best bet for rally durability, customizability and price (Bilstein was sort of the plan from the beginning, but I figured I should at least do the legwork). I told Sean what our damper requirements were and set him loose on finding something that matches. After several weeks of phone calls and e-mails, we finally found somebody who didn't think we were totally nuts when we asked about custom valved inverted strut inserts. I think that may have been the hardest part of this project, so I'm glad Sean took care of it.
Meanwhile, I took a bunch of parts from Dmitriy to measure and put into CAD so that I could ensure that the new struts would fit. I got something like this:
 Left is stock and Right is...not
The dampers won't be coming for another couple of weeks, so I've just been plugging away at making these things. It's been interesting because the strut tubes are near the limit of what my lathe will do, but it does a pretty good job.


Turning...
 Tada!
Tada!I've also been making spring perches in a HUGE vertical machining center because it removes material much faster than the lathe does and it does it with one press of a button. They still need to be finished up on the lathe though.

The exciting news is that I just finished up the first strut tube today. The next steps are to plate it so the threads have some protection, and then send it off to powdercoat. Of course I'll wait until all of them are done to do that, but that should happen very very soon.

So that's where I'm at now. I'll update as progress is made, but for the most part it's just duplicating parts so it's not terribly exciting. Meanwhile, check out Dmitriy's build over on SpecialStage (I think it exists in a few other places too, but that's where I keep track of it).
Sunday, March 27, 2011
GTI Rallycar Brake System, post 2
Rally Brake System:
Stock master cylinder and brake booster
All new rerun hardline, all AN Flares. SS braided line at each corner
Lines run inside bodywork
Rear corners run from wheel wells to calipers, no hardware mounted on beam
Rear circuit has series bias adjuster and second master cylinder

Above is a current image showing the rear brake line heading through the bias adjuster (before e-brake cylinder) and the e-brake master cylinder setup using the stock lever. We plugged one port in the stock master cylinder up front and ran one line to rear, T after e-brake master cylinder. Works great, note the drilled lever button and pins stored on the lever...
Stock master cylinder and brake booster
All new rerun hardline, all AN Flares. SS braided line at each corner
Lines run inside bodywork
Rear corners run from wheel wells to calipers, no hardware mounted on beam
Rear circuit has series bias adjuster and second master cylinder
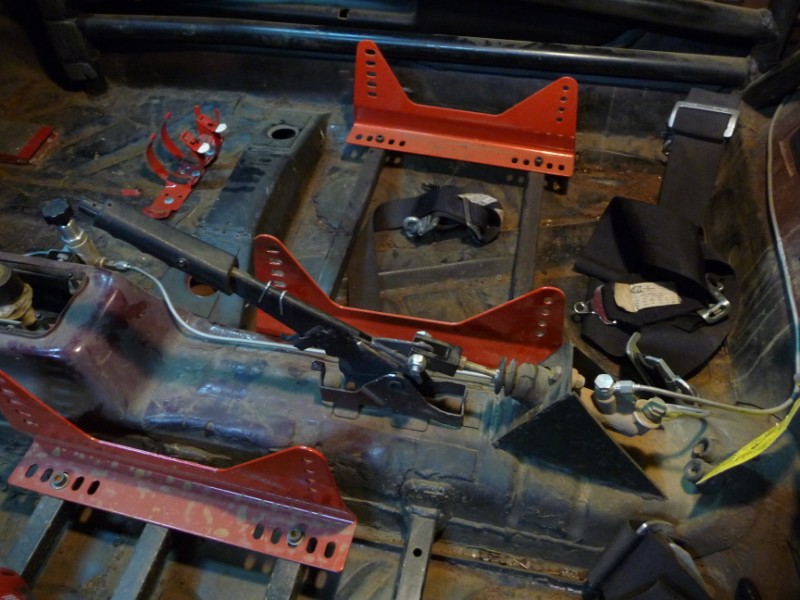
Above is a current image showing the rear brake line heading through the bias adjuster (before e-brake cylinder) and the e-brake master cylinder setup using the stock lever. We plugged one port in the stock master cylinder up front and ran one line to rear, T after e-brake master cylinder. Works great, note the drilled lever button and pins stored on the lever...
GTI Rallycar Brake System, post 1
One of the items inherited with the car was the stock brake system. Which of course is pretty OK, aside from terrible e-brakes due to a seized cable on one side. So we completely redid it. In retrospect, the e-brake could have been fixed with a new cable, but the greatest gains were the initial asides: the brake bias adjust and system being completely separate from the rear axle have been critical, and I'm thrilled with the simplicity and effectiveness of the new brakes.
The old system is all DIN flares, cross-diagonal setup, brake lines run under the car, and bias adjusted by a lever which measures the rear suspension compression. Many brake components and lines were mounted to the rear beam. Of course, cable e-brake. As it was, with the slightly raised rear ride height, the stock system was heavily biasing towards the front.
The new system is stock master cylinder, all AN flares (every line is completely redone), rear brake line run inside the car, a second master cylinder plumbed in series for the e-brake, and flex lines running from the wheel wells to the calipers, nothing is mounted to the beam.
This was all done at Kenneth's, thank you! I was without garage at the time...

Sunday, January 30, 2011
Sno*Drift 2011: More Videos
We made it back home today after a leisurely drive back to Ann Arbor. I'm happy to be home, and I'm sure that my memories of the rally will become fonder as time passes. As it is, I'm half thinking that rally sucks. It's so hard, and I'm not even driving! But I did really enjoy it too, so it's not like I'm going to quit.
Anyway, thanks to Chris for pointing us to a video of our big off from SS14. You can see it here starting at about 7:50
I also uploaded our in-car footage of that entire stage, so you can see what we saw starting at about 6:30 in this video.
Thinking back to it, we really should have just had the spectators push us out and we would have been able to finish the stage, but we're still new to this, and we still would have lost a ton of time in service anyway. It's unlikely that anything would have made our sloppy second day much better.
Saturday, January 29, 2011
Sno*Drift 2011 Day 3: SS8 to SS18
We were feeling really good about our results from yesterday, but we were also concerned that with the significantly faster stages today, our power disadvantage would really manifest itself. We definitely weren't able to keep up the blistering pace that we had yesterday.
Even as co-driver, and knowing what corners were coming up, I was just deathly afraid that I'd mis-count the crests and not tell Sean to slow for tight corners when we were going 80-90 mph down long rolling straightaways. Luckily, that didn't happen even though it just meant that we were a little more cautious than we actually needed to be.
Sean had his own problems, as he woke up feeling a bit nauseous and this lasted through most of the day. He couldn't eat or drink without feeling worse, but of course not eating and drinking also made him feel pretty bad.
After establishing that Sean wasn't as comfortable going super fast, we merely went pretty fast. So we weren't way up in the standings like we were yesterday, but we still did ok.
The first service was not terribly eventful, and we ended up just putting on some chemical toe warmers while the crew looked the car over a little. Then we all went over to the Super Special Stage in the Buttles gravel pit. This was a lot like a rallycross, so it was somewhat familiar territory. It was pretty rough though at least right at the beginning, and it may have led to this:
 We did pretty well in the Super Special Stage, but after that, things got a little bit sketchier. At the very end of SS14: Camp 8, we were headed downhill toward a very tight right hander, but we didn't slow nearly enough and ended up slamming into a snowbank sideways at 60+ mph. That was terrifying and we both thought we were going to roll the car. Also, we were only about 100 yards from the finish. Luckily, we only debeaded one tire, so we promptly got to work fixing that. Additionally, we happened to be in a huge spectator area with a commentator who said something like "the co-driver can run down the road and get a time," so I did. Running in the snow sucks, and then when I got to the control, they told me that that wasn't actually a rule. Luckily, as I was headed back, I noticed that Sean had gotten the car back together and was coming to pick me up. We ended up losing about 10 minutes on that stage.
The next stage, the 15 mile long Camp 30 was nearly as scary. Again, down a hill into a hard and icy right hander without slowing enough, and we smacked a snowbank with the left side of the car again. This snowbank must have been a bit harder, because now the car didn't drive quite right and made terrible noises when the left rear suspension was compressed. We finished out this crazy long stage and had a look, and we noticed that the wheel suddenly had around 8 degrees of positive camber. We didn't have much choice but to finish the next stage before going to service, so that's what we did.
We texted the crew to look for a new rear beam and rear axles. By the time we got back to service, they had obtained some extra parts from Matt Bushore and we were all ready to fix the car. All of the crew was involved as well as people who weren't even part of our crew like Matt and a couple of spectators who we happened to know. We went way over time on our service, but got the beam, stub axles and brake rotors replaced within an hour, just in time to be able to continue the rally. Like I said before, our crew is amazing.
 We finished out the last two stages with some cautious driving just so we could actually finish the rally. Results for the day weren't nearly as good as yesterday's, but we were excited just to finish. I think we did pretty well for our first rally, and just a couple of mistakes in the second half cost us an obscene amount of time. At least we're going home with 2nd place in G2 for the Sno Regional Rally. Next event hopefully will be the New England Forest Rally in July. We'll be making a lot of changes before that event, so watch the blog for details!
Subscribe to:
Posts (Atom)