ICEngineering Subjects

Showing posts with label RX-8. Show all posts

Wednesday, March 13, 2013

STX RX-8: Diffs and Dampers

 
As detailed in the last post, I bought a bunch of stuff. Of course, I don't like to make things too easy on myself, so it wasn't as simple as bolting on the Koni 2812's and sticking the OS Giken diff in the rear end. Let's start with the dampers.

The dampers were mostly good to go right out of the box, but I wanted some work to do. The first thing I did was have my friend Allen (who owns the turbo Miata discussed here) run them on a shock dyno along with my old Koni Yellows so that I could baseline them and determine how healthy they were. I got a bunch of cool charts like this:


This was also helpful because it told me that one of the dampers was a little low on gas pressure. For those who don't know, gas charged monotube dampers like the Koni 2812 have a floating piston inside of them that moves up and down to allow the fluid chamber volume to stay constant as the piston rod enters the shock body through the damper's stroke. The floating piston is pushed on by high pressure nitrogen gas so that when the piston rod leaves again, it doesn't induce vacuum in the fluid which would cause air bubbles to precipitate out and make the damping forces really unpredictable. That's all clear? Good.

I could get the whole set rebuilt at some crazy cost, but since I'm cheap and don't like shipping stuff, I decided to just leave the old fluid since it seems to be damping ok and simply refresh the nitrogen gas charge in all the dampers. That sounds pretty simple, except that to keep a low profile on the damper body, Koni's charge port is just a hole with a bolt in it, which unlike a schrader valve has nothing to to thread a fill tool onto and requires a bunch of rotation of a socket head screw to open and close the "valve."

So I went to Harbor Freight, bought some cheap locking pliers and made a tool!

 
It's not that clever, since it's just copied from pictures I found of the actual Koni tool.

That upper part with the valve and knob sticking out of it creates a sealed chamber around the fill screw once it's clamped around the shock body, and then the knob is attached to an allen key sealed to the chamber for opening and closing. The idea is sound, except even with the smallest chamber that I could reasonably make, it still required 30+ pounds of pushing against the gas pressure to get the allen key seated in the screw and was also a little bit finicky about sealing against the shock body. So thanks to Allen for dealing with that for me!

So now the shocks are good as almost-new (which is different from almost good as new). Another annoying thing is that the adjusters for the front dampers are pretty hokey looking for super high end shocks. As far as I can tell, damping adjuster knobs are like the pride and joy of many damper manufacturers. They're usually really pretty machined and brightly anodized things. The Koni adjusters are basically nuts.

They're so tiny, I couldn't even turn them by hand!

Given how lazy I normally am, I probably would have just left them. However, one of them was lost in shipping and Koni wants $12 for these things! Really not so bad, but it was an excuse to make something cool. A little bit of machine time later, I had some nice knurled aluminum knobs that I didn't need tools to operate (picture later).

The last thing is actually something that I had put off from last season. I had installed spherical bearings in the rear shock tops, but that was easy stuff because it only needed very basic manual machine operations and a little bit of welding. The fronts would need new top hats made from scratch, so I actually got through about 1/3 of the fabrication on those and then set it aside for some reason. I decided to pick that back up and finish it. I first tried the lazy approach which was to finish them up with only a lathe operation.


But it turns out that shock tops are shaped like almost-triangles for a reason, and the reason is that circles don't fit. So I fired up the big machine and made them nice looking.


With those all done plus the fancy new adjusters, I assembled everything together for a nice photo.
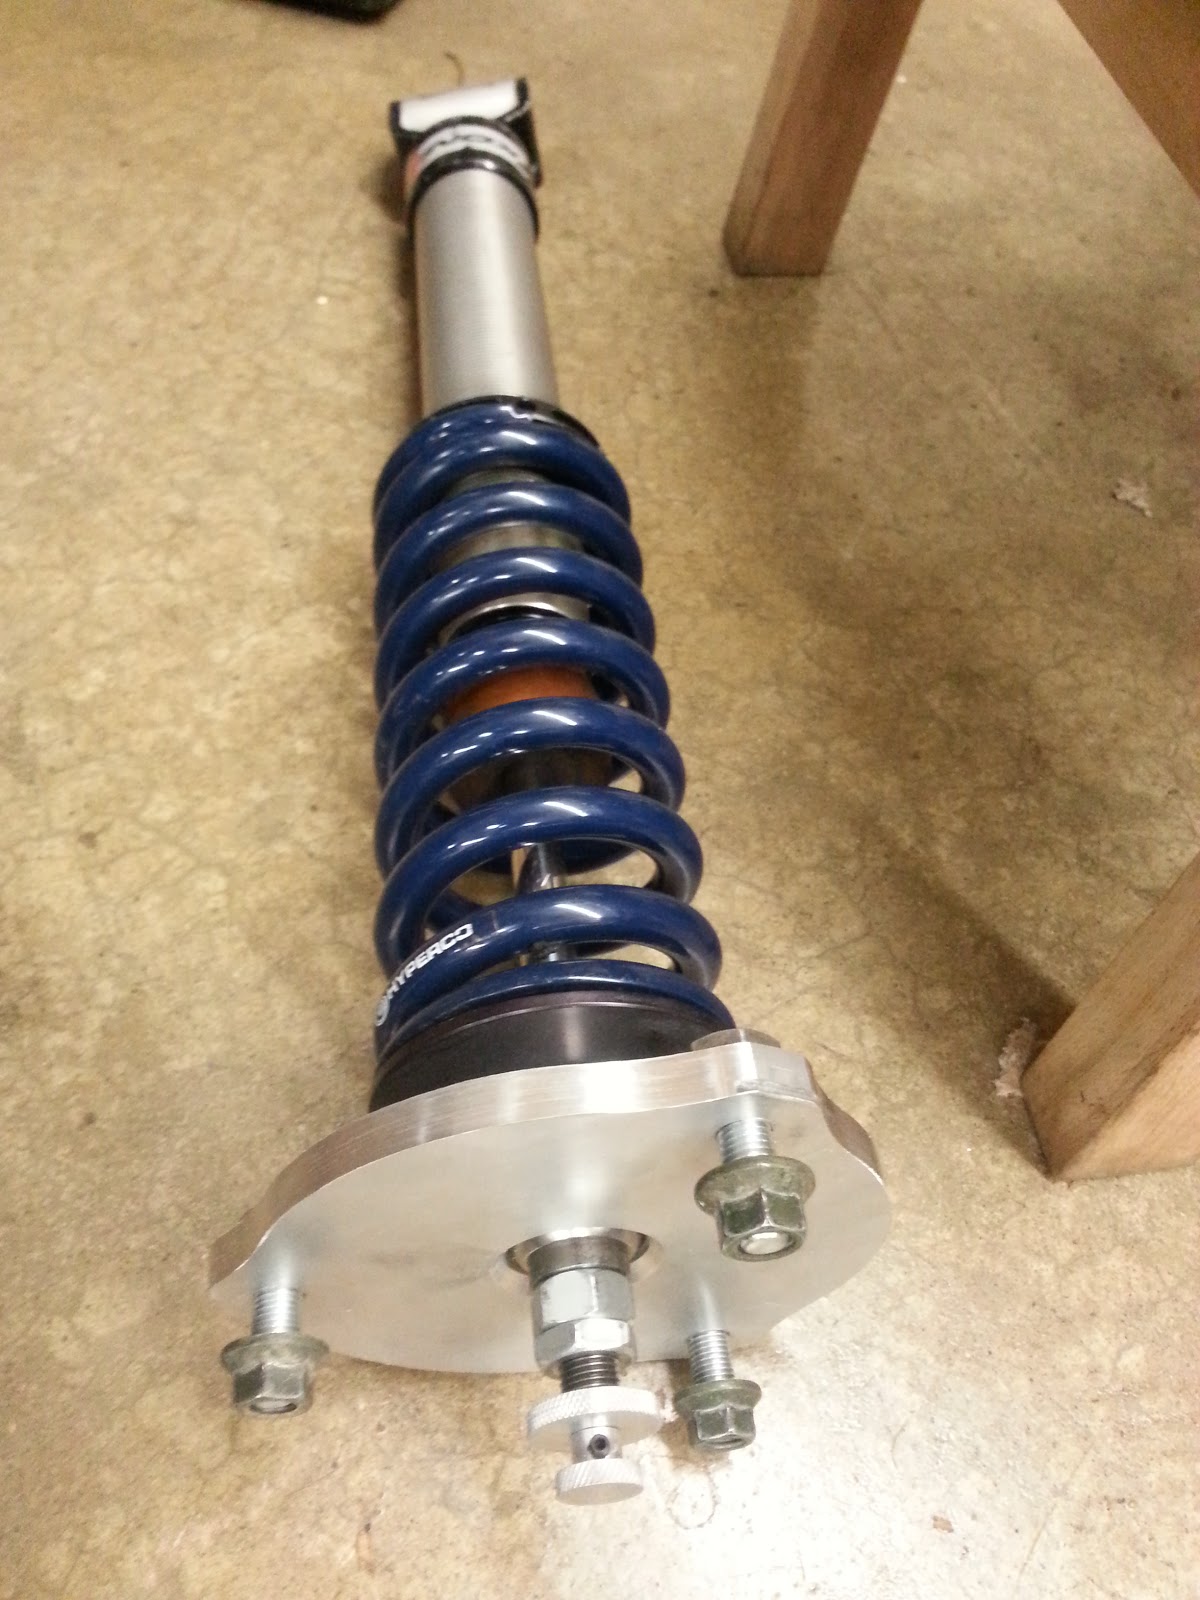

Now on to the diff. This was pretty much just a bunch of wrenching. Step 1 was to take apart everything out back.


I actually disassembled more than you'd need to for just the diff, but I also wanted to change out my wheel studs, which for some stupid reason requires dismantling the rear upright and ruining a perfectly good set of wheel bearings. So Rob and I spent a couple of quality hours with a press doing that...

 This is what happens when you try to remove the hub. The bearing is wrecked.
 But it's nice enough to leave the race stuck on the hub...
 Which needs to be carefully ground off
 Just so I can put in some studs
 Installation is the reverse of removal... 

With that taken care of, we pulled out the diff and swapped it for the OS Giken unit. I really really didn't want to mess with setting lash because the RX-8 uses swappable shims to set both lash and bearing preload, and I didn't want to buy any, so I was just hoping that the carrier-bearing-to-ring-gear-mounting-distance would be exactly the same as stock...

OS Giken on the left, stock Torsen on the right. Height gauge in the back.

Turns out it was! So that was easy enough. We checked the lash just in case, but it of course required no adjustment.


A few hours in the garage later, and we got the rear end all buttoned up again.

That's Rob. People have trouble telling us apart because we're both Chinese.


Now it pretty much just needs an alignment and a wash, and it'll be ready to go a Test-n-Tune in April.

Tuesday, February 12, 2013

STX RX-8: Ramping Up For 2013


The 2013 Solo season is fast approaching, with the first event of the year being a Match Tour in Wilmington, OH on April 6th. That's a national level event at a new highly anticipated site, so it should be very popular and a potentially very demoralizing way to shake off the cobwebs.

In anticipation for things to get going again, I've been buying/making a lot of stuff so hopefully the car will be even better than it was last year. It's costing me a lot of money, so it had better be worth something!

#1: Dampers

I detailed a little bit of the build-out of my single adjustable Koni Sport dampers in an earlier post. That was pretty much the cheapest way that I could come up with to get a decent set of coilovers on the car, and those shocks have served me very well over the past 5 years. They definitely have some issues, like needing to be removed from the rear of the car to adjust rebound (so I pretty much never do it) and not having enough damping to control wheel hop on launch. They are also the same length as stock, though my car is nearly 2" lower than stock, so usable travel is pretty small, and it turns out that there's a reason why the stock spring is so huge in diameter, because the small-diameter race springs rub the shock bodies over bumps. I've dealt with these things for 3 years, so it's not like it's killing me, but my expectations for results have been raised significantly due to the car's performance last year so I was pretty set on a damper upgrade.

At Nationals, I had poked around the paddock a bit to see what kinds of dampers people were running so I could get an idea of what the fast guys did. I decided that I wanted something double adjustable (rebound and compression) and preferably a monotube so I could run the rears inverted and not have to deal with the springs rubbing. Those two requirements immediately put me up in the Moton/Ohlins territory that was greater than $5000 for a set of dampers.

Instead, I decided to take advantage of the modular construction of my existing dampers and I would have them revalved with higher damping rates and converted to double adjustable or at the very least, have the rear rebound adjustment be made external. This would run me about $1200 and wouldn't fix all of my problems, but it captures 90% of the improvement that I was looking for at about 20% of the cost.

This all changed when at the end of October 2012, I stumbled upon somebody on RX8club.com selling a set of Koni 2812's. These are Koni's top-of-the-line double adjustable aluminum bodied monotubes with some extra-fancy proprietary valving arrangement. They weren't cheap, but they also weren't $5000, so I waffled over it for a while like I always do about big purchases and then bought them.

Old vs New
 
So that's a big deal. I've done a little bit of stuff with these, and that'll be detailed later, but I'm pretty excited to see how this will affect performance.

#2: Limited Slip Differential

Another gigantic purchase that I had been seriously on the fence about is an upgraded differential. The RX-8 comes with a helical-gear Torsen-style differential which is theoretically great and it works pretty well, but it's totally untunable and I don't think that it's quite right for what I need the car to do. This is a tough decision similar to what I went through with the dampers because I know that the existing solution works, but there are better solutions out there. Unfortunately, it's nearly impossible to quantify the benefit of those better solutions, making the cost/benefit ratio indeterminate.

So...I decided to just bite the bullet and get the best/most expensive diff available for the RX-8; the OS Giken Super Lock LSD.


It took me a while to figure out what was going on inside the OS Giken diff that was not happening in other clutch type diffs like Kaaz and Carbonetic, but when I finally got it, I deemed that it was enough difference to warrant the $500 cost difference. I hope that's true. And I'll never know if it is, so it doesn't matter.

In preparation for this, a good friend Rob and I pulled the car out of winter storage (wherein it is nearly touching the south wall of my garage to make room for the Starlet) and stood it up on stands to begin the brutal dismemberment of the rear end of my car (again) so that we can get the diff out.

The car is unbelievably dusty

Again, there will be more on that later.

#3: Wheels and Tires

I've been running on these cheap but heavy 5Zigen FN01-RC wheels in a 17x9 +43 wheels for a few years now. I got them because they are crazy cheap at around $800 for the set. They also look pretty cool, and I got them at the same time that I got wheels for our white Fit so both cars that we had at the time would match.

Somehow I don't have a picture of the two cars together

However, without exception, anyone who has been nice enough to help me change wheels at an autocross has commented on how obscenely heavy my wheel/tire package is. I've been tempted to buy some lighter wheels for a while but just like with the other upgrades, it was difficult to justify the cost when I already had a workable solution. I got lucky when fellow SE Michigan STX RX-8 driver Brandon decided to sell his Enkei RPF-1's at the end of last season so that he could fit a big brake kit. So now I finally have light wheels. Plus they're gold which is super sweet.

And they've been stored in the car since October

As for tires, there is currently a street tire arms race going on with Dunlop and BFGoodrich having already released their latest and greatest ST-legal tires and there have been talks of an entry from Bridgestone and possibly Kumho. I'm not sure what to do about that yet, so I'm going to wait and see if anybody gets some good testing in before I need to buy tires.

So that's a quick overview of what's happening with the RX-8. I'll get more in depth into some of this stuff when projects start getting completed. I really hope the car will be faster!

Thursday, November 29, 2012

STX RX-8: 2012 Season Overview


Long absence as I don’t really have the attention span to do more than one thing at a time. I’ve been concentrating pretty hard on autocrossing this season without much time to do anything else.

Last winter, I did a bunch of work with very poor hours-of-labor to seconds-on-course ratios.
First was dropping the rear subframe to replace the bushings with UHMW polyethylene. This should reduce subframe movement which probably causes understeer-inducing toe change under load. The STX rules don’t allow metal, so acetal (delrin) or UHMW are about as good as it gets. UHMW is really cheap, and its suitability for subframe bushings is about the same as delrin so that’s what I went with. Both are ridiculously easy to machine:


The worst part of this task is definitely dealing with the subframe when all of your fasteners are rusty from having been too careless with the car in crappy conditions. I could also use a transmission jack or something a little bigger (or another person I guess):


I burned/sawed out the old bushings, pressed in the new ones and gave the subframe a good cleaning and a new coat of paint:


Bolting that back up was approximately equal in pain-in-the-ass-ness to removing it, but at least everything was clean.

Next on the list was spherical bearings at the ends of the dampers. The RX-8's dampers (like just about every other production car's) are mounted on squishy rubber bushings for good NVH. However, they do lots of twisting and pivoting around to keep from bending the damper, so I wanted to replace them with spherical bearings with no slop and less friction. While I was at it, I also modified my spring perches so that I could lower the car more. Of course I'm still using my dirt cheap Koni Yellow dampers that I've had for the last 5 years, so the sphericals cost about 1/3 of what the dampers cost. I'm still not sure what I think of that fact.

The rear shock bushings need to do a lot more twisting and bending than the fronts because of how they're mounted, so I did those first. And then the season started and I never really got around to doing the fronts. Oops. First, I made a carrier sleeve to weld into the lower shock eye that would take the spherical bearing and a retaining ring to hold it in:


You can see in that picture how I have my coilover spring perches sitting as low as they'll go, so I cut off the factory spring perch to leave a little lip and bored a step into the coilover sleeve so it could slide down lower but still be retained by that lip. I also welded in that spherical housing:


I did the same thing up front with the spring perches. However, the lower mount of the front shock has a clevis that attaches to a bushing in the control arm, so I'm unsure of the legality of replacing that with a spherical.

Up top, I lopped off the top of the shock mount and welded in another spherical housing, this time with a bolted plate to retain the bearing. I see now that I don't have pictures of that...it's not very interesting anyway.

The last thing I had planned was a new exhaust. I knew of a local guy (Brian McNamara) running an aluminum exhaust on his FSP Civic, and I thought that might be a good fit for me because it's light and aluminum is a lot cheaper than stainless steel. I also planned to package more than one muffler, hoping that would make it quieter than my current single straight-through Borla setup (it's definitely louder). So I bought a pair of Vibrant aluminum mufflers and a bunch of bends and tubing, meanwhile convincing friend and local STX competitor Eric Shin to do the same on his WRX Wagon. We built his first because it was a heck of a lot easier:

This one weighs about 7 lbs

Mine was complicated because it needed to go through two holes in the bumper and package two mufflers. We were up pretty late getting this thing finished up:

Mine was 11 lbs

Eric's exhaust worked awesome with no signs of damage for the entire year except for a slight dent from a stray cone. Unfortunately, the fact that I don't have any heat-extracting turbocharging devices in my exhaust stream coupled with the fact that rotaries have pretty extreme exhaust temperatures to begin with meant that mine ended up cracking and falling off while autocrossing in Nebraska. That made for a long, loud drive home. I ended up reattaching the old Borla single-exit exhaust to use for the rest of the season.

Those were the winter projects. When the season finally started, the car was AWFUL! I was kept up at night during the week between events worrying about how I could possibly run a national-ish campaign with the car being so terrible. It was extremely sensitive to throttle inputs and would start sliding uncontrollably on every corner exit. I changed everything; spring rates, damping, new sway bars, ride heights, tire pressures, toe, camber...everything. But the car was suspiciously unaffected. I started looking for bind; I used a load cell to measure linearity of force to travel due to bushing compliance and to see where I contacted the bumpstops and how non-linear they were and I couldn't find anything. It was amazingly frustrating. 

Eventually, the new Hankook tires that my co-driver had ordered came in (they were on back-order) one week before we were to go to Lincoln for "Spring Nationals" and everything was fixed! In fact, it was really dumb of me to not just try new tires at some point. We didn't know that it was all better until we got to Lincoln though, so it was a crazy risk to take. The car was suddenly just incredible. I got my second ever national trophy at the Lincoln National Tour, but the greatest reward was the relief that I felt that I wasn't just unbelievably awful at putting a car together.

Following that fiasco, this was by far the best autocross season that I've had. I had a great competitive STX class to run with back at home, and I was regularly winning the class and achieving top 10 indexed results, right in the mix with some of the best drivers in the region:


Then, something totally unexpected happened. In July, I went into the Toledo Pro Solo hoping to trophy in the biggest class at the event, but somehow I managed to actually win it outright! After my winning set of runs, I got out of the car and almost fell over because I just couldn't believe it.


I went on to take 2nd in the Peru National Tour just one week later, which confirmed to me that the car was awesome and incredibly easy for me to drive fast. I was really excited for Nationals.

However, Nationals didn't go quite as well. My tires were looking almost like slicks by the time September rolled around, but anecdotal evidence about the Hankooks indicated that they are good until they cord, so I just left them. That was definitely a mistake. They had enough life to get me 3rd place in the Pro Solo Finale, though their breakaway characteristics had definitely gotten less predictable so I was sitting on one incredible left-side run and a downright terrible right-side run.

For the National Championship, the car had become very difficult to drive. It was great for the first run only, so both I and my co-driver ended up way at the back of the pack. A huge letdown for the end of a great season.

The one good thing that came out of that week in Lincoln was that my 3rd place finish in the Pro Solo Finale netted me a 2nd place overall in the season points for Pro Solo. Good for a nice trophy and a bunch of contingency money from Mazda.

Well, if that isn't just the worst photo ever...
 
I wrapped up the season with just a few local events, including a drive in my co-driver's new BR-Z on Hoosiers the weekend after Nationals (it's great in case you're wondering).

Overall, the season was not perfect but it was MUCH better than expected (trophies in 4 of 6 national events attended), and I learned a lot of things so I'm really looking forward to next season. I'm also looking forward to a break from racing over the winter so look for some progress on the Starlet in the coming months. I'll also be making some major improvements to the RX-8, so maybe I'll update on those things in smaller and more frequent posts.

Thursday, October 6, 2011

STX RX-8: STX Legal Intake

SCCA's Street Touring classes were originally formed to draw in the "street tuner" crowd, so that new guys with just a bunch of bolt-ons that don't really add a whole lot of performance don't get pushed into Street Prepared where they run against a bunch of full-on race cars. Now it's just a bunch of full-on race cars with street tires.

Anyway, one of the most ubiquitous bolt-ons is the intake. It usually makes the engine a little bit noisier, the engine bay a little bit cooler-looking and on most modern engines, adds very little power. That's pretty much why I didn't put one on for my first year of running STX. Instead, I put together an exhaust that makes the car MUCH noisier, and adds a tiny bit of power. Good choice, right?

From a little bit of research, it looks like AEM's intake system nets the greatest power gains of any intake on the market. I have no idea why, because they're all basically a tube with a filter at the end. The AEM (also sold as a Mazdaspeed intake) snakes behind the front bumper support to put the filter right in the RX-8's huge grille opening. This is actually not STX legal because it requires the removal of a piece of plastic that is technically part of the cooling system, so a lot of STX RX-8 (and STR MX-5) owners have re-routed their AEM intakes to place the filter just above the bumper support, hidden by the bumper cover. This requires buying more stuff on top of the $325 purchase price of the AEM system.

Here's an example of a modified AEM intake on an MX-5

I figured I could build my own a little cheaper, so I ordered the following things:

1. 2' Mandrel Bent Aluminum 45° Bend, 3.5"
2. 2' Mandrel Bent Aluminum 90° Bend, 3.5"
3. 3.5" Silicone Hump Hose, Black
4. Silicone Reducer, 3.5" to 3.0"
5. AEM DryFlow Air Filter 21-2047DK
6. A bunch of hose clamps

I actually ordered more stuff but ended up not needing it.

First, I pulled the MAF off of the existing intake and measured it so I could reproduce its mount in aluminum.

Then, I realized that people just sell these things for $13!

I stripped the old intake off the car, and started shoving stuff into place:

Step 1: Remove everything. And yes, I know it's really dirty in there.

Step 2: Jam filter between core support and bumper beam

And Step 3: Connect the dots. That was the time-consuming part. I actually got away with just cutting up the 45 degree bent tube into two pieces and welding it back together in a different orientation.

Step 4: Stick these things togetherI'm still figuring out this aluminum welding thing

Step 5: Bolt it all together and now I have a sweet looking intake!

It's sweet looking if you ignore that one rusty hose clamp

I weighed all the crap I took off at 12.124 lbs (it was a needlessly precise scale), and all the new stuff weighed in at 4.848 lbs, for a total weight savings of about 7.25 lbs. I can't tell a difference in power, and I really don't notice any difference in noise due to my ridiculously loud exhaust. All in all, I'm not sure that it was worth the $150, but it looks pretty nice and it was fun to build.

Next installment will be the battery. You can see in the photos that I already got a little one, but it's mounted really poorly. That should be taken care of within the next week.

STX RX-8: Introduction

This is my 2005 Mazda RX-8:


I bought it new in July of 2005 and since then, it's been through a lot:

And by that, I mean a lot of dirt

I started autocrossing the car back in 2008 with the Detroit Region of the SCCA. I started out driving it completely stock in our local Street Tire B Stock class. In 2009, I graduated to R compound tires to run in the nationally recognized B Stock class. I also began to travel a little bit more for events, hitting the large sites in Peru, Indiana, Toledo, Ohio and Oscoda, Michigan.

In 2010, I decided that I didn't want to have to buy more R compounds (they're super expensive and last less than 100 runs) and I wanted to tinker with stuff, so I made the leap to the Street Touring eXtreme (STX) class. I used the Koni Sport dampers that I had been running in Stock, added some coilover sleeves, machined some spring perch adapters to take 2.5" ID race springs, bought some wheels and tires, welded together a catted midpipe, and I was in STX for only about $1500.

Pictured: Really cheap suspension

The car handled pretty well from the get-go, netting me better indexed results than I had ever achieved in Stock class. Of course much of this could be attributed to experience, but it was also more fun than ever without the massive body roll brought on by the soft-spring/high-grip setup Stock setup. With just some alignment tweaking and driver adjustment, the car got better and better through the year. In fact, my co-driver at the Toledo Pro Solo took second place just behind the eventual STX national champion, while I coned away fourth place and ended up way back in tenth.

In 2011, I netted myself a co-drive in a friend's STU Mitsubishi Evolution IX (to continue my trend of jumping classes every year). The car is extremely well-built, featuring AST dampers and TONS of horsepower.

It's real pretty too

I ended up making my first trip to Solo Nationals in that car and having terrible results on one day and pretty good results the next.

For now, the plan is to go back to Nationals, with pretty good odds of driving my RX-8. This means that it needs to be close to the level of prep that the Evo is at so that it actually has some shot at being competitive. Unfortunately, I'm super cheap so I try to do everything the hard way rather than spending a few extra bucks to get bits and pieces that already exist. But, that affords me the opportunity to make stuff and get some fabrication experience. So, I'll be documenting some of the stuff I make/buy/modify for my RX-8 here on the blog.

Things on the list:
1. Intake
2. Little battery with custom billet tray/tie-down
3. New rear dampers
4. Custom full 3" exhaust, possibly including header
5. Cobb AccessPort and tune (well, this one is just paying somebody else)

Let's see how much of this actually gets done!