Side pre-note: Today we're registered for Sno*Drift, though we've known we've been going for a while. I'm looking forward to the event weekend for both our ICEngineering autonomy and teamwork: autonomy in how we'll finally be support self-sustained with my new favorite truck, and teamwork in our lodging, where we'll be lucky enough to be renting a cabin and garage with both G2 teams Billy Elliot/Mary Warren and Dmitriy Martynov/Jon Tinsey. It'll be a full house, hopefully an idle garage.
As for the GTI
I've got a spare transmission, so I've got it in my head to weld the diff. I figured: a) It can't hurt, and more importantly b) I've always wanted to try it. So I've turned my working (if tired) 2nd trans into a useless pile of gears (that's called progress, right?). I haven't done anything in the past week to weld it and put it back together...
But for a long-term solution I've found that the original 020 transmission for the mk2, while decently durable under 140hp, lightweight, and decently geared...is too old. Final drives, differentials, and especially gearsets are either too expensive or simply not available. Luckily, VW's are made like legos, and literally any 4-cyl transmission is likely to fit. I'll be bolting up an 02J (as opposed to 02A only because that's what I found available) once I get the internals sorted. Thanks to the VW community in Michigan here, I've been able to round up nearly all the stock parts I need, and for a really decent price. Side benefits include supporting all the torque I could ever make, eliminating the shift linkage mechanism, and an elevated shift box placement option thanks to the same. Below picture shows my 2(!) 02j boxes, both uniquely broken, a bucket of gears which is likely junk but maybe has some spares or little pieces I can use, and the cable shift box with cables. I'm only missing a cable-clutch adapter setup and starter.
Regarding the standard repairs after Black River Stages, everything's together except for the exhaust. See the shots below for the boxed transmission brace, new PU trans mount, and PU inserts on the new rear mount. That engine doesn't wiggle a bit. Also, see if you can spot all the engine-as-pinball damage still present from BRS, including some light inadvertent machining work on both halfshafts. Nothing past cosmetic though. And yes, there's a lot of oil all over the place, both the engine and trans have ...significant weeps.
As for the exhaust, we could just replace the cat with a spun, metal core one, but we'll do a little better. The exhaust was too loud. Apparently, I could have figured this out before trial by some basic research, and found naturally aspirated motors of all types require more than a useless resonator and a cat to pass sound requirements. Not to mention it was a bit difficult inside the car to hear each other. I've ordered a short hushpower 2 to replace the stock resonator; we should be more reasonably-toned, and also a couple pounds lighter.
Current exhaust v.1 setup on left. The 4-2 section of the 4-2-1 headers are on the engine. Exhaust v.2 will replace the resonator with the hushpower, replace the busted stock cat with a spun metal-core one, have another v-band instead of the slip fit, and welded-on hangers throughout. Hopefully v2 lasts a couple events without necessary revision. We can only hope...
ICEngineering Subjects
- Projects (37)
- GTI (30)
- Competition (20)
- Design and Fabrication (14)
- RX-8 (5)
- Starlet (3)
Sunday, December 11, 2011
Sunday, November 13, 2011
Sno-Drift Upcoming
Posted by
Sean Murphy
Our next stage rally event is Sno-Drift 2012, in Lewiston MI. The event promises to be fairly epic - the rumor I've heard is 24 special stages in 2 days. Last year there were 18, and we didn't feel short-changed then... We'll be looking to put together some of last years first day (2nd in G2) with a little bit of Black River's full-weekend smooth execution, and hope to finish top 5 G2, at the end of the whole weekend. Top 5 all 2wd would be even sweeter.
Quick car update - it's torn down to reveal all damage, and the broken parts tally is a kill switch (odd), 2 engine mounts, 3 engine mount stays, and only a loose lower ball joint to cause the wandering steering (!). It'll be back together in time for the next local rallycross, December 10.
In an attempt to even out the wrenching+expense vs seat time (plus a load of fun), I've managed to pick up a 125cc shifter kart for a great price, and even got it out on track before the season changed too much. So here it is. It's proven to me about 10x more clearly than even rally that being fit, strong and healthy is a huge competitive advantage - and when I can drive this for 20minutes without fatigue I'll be able to drive the rallycar all weekend without straining.
Sunday, October 9, 2011
BRS Recap
Posted by
Sean Murphy
Been a couple weeks since BRS now, and since Kenneth and I decided it wasn't in our schedules to get more time for LSPR, I've taken the opportunity to see the fall colors from my mountain bike and generally get away from the garage for a week or two. And get a truck, more on that later...
Kenneth said it correctly when we didn't really believe all the NASA schedule rumors (as in, lay out the picnic blanket a couple times a day) - but sitting at what would be the start of the second special stage, with the sun going down and no lights on the car, we began to believe it. The rally was scheduled to start at 3:30, with ~30 miles of stage and transit before the first service...maybe that was part of what I was looking for. It was most important to me to run a smooth weekend, and the breaks certainly made it easy for us in the car, keeping us more rested. If I do another NASA rally I'd bring a camera to prove it.
Thanks to our small but awesome crew, Kyle Steinkamp and Matt Bushore (of Bent Mettle racing, certainly not where he likes to be instead of competing for podium as driver, but a huge asset to us that weekend), the weekend was smooth outside the car as well.
Having finished with no offs, and only 1 close call (those jumps in that video is the wildest it got, tame compared to the number of close calls at sno-drift), it's easy to say we should have driven faster. I've found that we actually did manage to destroy 2 of 3 engine mounts, but hey, the skid plate held it up in there!
So, to recap for now:
BRS Goals: All achieved
1) Find way to both rally AND eat and sleep (= have fun, all weekend)
2) Finish with no driver-error damage
3) Run the car with engine swap and custom electric
Next rally goals: As above, + actually drive fast
Also, with no MAJOR changes planned for the car, I look forward to all the finishing and sorting work which has been put off so far.
Some pictures:
Also I have a truck. It's not pretty, I've promised to keep it's name (Tank), and look forward first to wheel to wheel ice racing this winter enabled by it, not to mention actually being able to go to rally when my previous tows are themselves racing.
Thursday, October 6, 2011
STX RX-8: STX Legal Intake
Posted by
Kenneth
SCCA's Street Touring classes were originally formed to draw in the "street tuner" crowd, so that new guys with just a bunch of bolt-ons that don't really add a whole lot of performance don't get pushed into Street Prepared where they run against a bunch of full-on race cars. Now it's just a bunch of full-on race cars with street tires.
Anyway, one of the most ubiquitous bolt-ons is the intake. It usually makes the engine a little bit noisier, the engine bay a little bit cooler-looking and on most modern engines, adds very little power. That's pretty much why I didn't put one on for my first year of running STX. Instead, I put together an exhaust that makes the car MUCH noisier, and adds a tiny bit of power. Good choice, right?
From a little bit of research, it looks like AEM's intake system nets the greatest power gains of any intake on the market. I have no idea why, because they're all basically a tube with a filter at the end. The AEM (also sold as a Mazdaspeed intake) snakes behind the front bumper support to put the filter right in the RX-8's huge grille opening. This is actually not STX legal because it requires the removal of a piece of plastic that is technically part of the cooling system, so a lot of STX RX-8 (and STR MX-5) owners have re-routed their AEM intakes to place the filter just above the bumper support, hidden by the bumper cover. This requires buying more stuff on top of the $325 purchase price of the AEM system.
Here's an example of a modified AEM intake on an MX-5
I figured I could build my own a little cheaper, so I ordered the following things:
1. 2' Mandrel Bent Aluminum 45° Bend, 3.5"
2. 2' Mandrel Bent Aluminum 90° Bend, 3.5"
3. 3.5" Silicone Hump Hose, Black
4. Silicone Reducer, 3.5" to 3.0"
5. AEM DryFlow Air Filter 21-2047DK
6. A bunch of hose clamps
I actually ordered more stuff but ended up not needing it.
First, I pulled the MAF off of the existing intake and measured it so I could reproduce its mount in aluminum.
Then, I realized that people just sell these things for $13!
I stripped the old intake off the car, and started shoving stuff into place:
Step 1: Remove everything. And yes, I know it's really dirty in there.
Step 2: Jam filter between core support and bumper beam
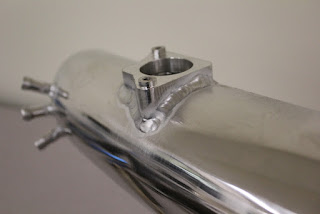
And Step 3: Connect the dots. That was the time-consuming part. I actually got away with just cutting up the 45 degree bent tube into two pieces and welding it back together in a different orientation.
Step 4: Stick these things togetherI'm still figuring out this aluminum welding thing
Step 5: Bolt it all together and now I have a sweet looking intake!
It's sweet looking if you ignore that one rusty hose clamp
I weighed all the crap I took off at 12.124 lbs (it was a needlessly precise scale), and all the new stuff weighed in at 4.848 lbs, for a total weight savings of about 7.25 lbs. I can't tell a difference in power, and I really don't notice any difference in noise due to my ridiculously loud exhaust. All in all, I'm not sure that it was worth the $150, but it looks pretty nice and it was fun to build.
Next installment will be the battery. You can see in the photos that I already got a little one, but it's mounted really poorly. That should be taken care of within the next week.
STX RX-8: Introduction
Posted by
Kenneth
This is my 2005 Mazda RX-8:
I bought it new in July of 2005 and since then, it's been through a lot:
In 2010, I decided that I didn't want to have to buy more R compounds (they're super expensive and last less than 100 runs) and I wanted to tinker with stuff, so I made the leap to the Street Touring eXtreme (STX) class. I used the Koni Sport dampers that I had been running in Stock, added some coilover sleeves, machined some spring perch adapters to take 2.5" ID race springs, bought some wheels and tires, welded together a catted midpipe, and I was in STX for only about $1500.
The car handled pretty well from the get-go, netting me better indexed results than I had ever achieved in Stock class. Of course much of this could be attributed to experience, but it was also more fun than ever without the massive body roll brought on by the soft-spring/high-grip setup Stock setup. With just some alignment tweaking and driver adjustment, the car got better and better through the year. In fact, my co-driver at the Toledo Pro Solo took second place just behind the eventual STX national champion, while I coned away fourth place and ended up way back in tenth.
In 2011, I netted myself a co-drive in a friend's STU Mitsubishi Evolution IX (to continue my trend of jumping classes every year). The car is extremely well-built, featuring AST dampers and TONS of horsepower.
I bought it new in July of 2005 and since then, it's been through a lot:
I started autocrossing the car back in 2008 with the Detroit Region of the SCCA. I started out driving it completely stock in our local Street Tire B Stock class. In 2009, I graduated to R compound tires to run in the nationally recognized B Stock class. I also began to travel a little bit more for events, hitting the large sites in Peru, Indiana, Toledo, Ohio and Oscoda, Michigan.
In 2010, I decided that I didn't want to have to buy more R compounds (they're super expensive and last less than 100 runs) and I wanted to tinker with stuff, so I made the leap to the Street Touring eXtreme (STX) class. I used the Koni Sport dampers that I had been running in Stock, added some coilover sleeves, machined some spring perch adapters to take 2.5" ID race springs, bought some wheels and tires, welded together a catted midpipe, and I was in STX for only about $1500.
The car handled pretty well from the get-go, netting me better indexed results than I had ever achieved in Stock class. Of course much of this could be attributed to experience, but it was also more fun than ever without the massive body roll brought on by the soft-spring/high-grip setup Stock setup. With just some alignment tweaking and driver adjustment, the car got better and better through the year. In fact, my co-driver at the Toledo Pro Solo took second place just behind the eventual STX national champion, while I coned away fourth place and ended up way back in tenth.
In 2011, I netted myself a co-drive in a friend's STU Mitsubishi Evolution IX (to continue my trend of jumping classes every year). The car is extremely well-built, featuring AST dampers and TONS of horsepower.
It's real pretty too
I ended up making my first trip to Solo Nationals in that car and having terrible results on one day and pretty good results the next.
For now, the plan is to go back to Nationals, with pretty good odds of driving my RX-8. This means that it needs to be close to the level of prep that the Evo is at so that it actually has some shot at being competitive. Unfortunately, I'm super cheap so I try to do everything the hard way rather than spending a few extra bucks to get bits and pieces that already exist. But, that affords me the opportunity to make stuff and get some fabrication experience. So, I'll be documenting some of the stuff I make/buy/modify for my RX-8 here on the blog.
Things on the list:
1. Intake
2. Little battery with custom billet tray/tie-down
3. New rear dampers
4. Custom full 3" exhaust, possibly including header
5. Cobb AccessPort and tune (well, this one is just paying somebody else)
Let's see how much of this actually gets done!
Saturday, September 24, 2011
Black River Stages - Actually Rallying
Posted by
Kenneth
I'm lazy so I didn't update yesterday after our first day of rallying in New York. We had heard a lot of stories about waiting around at stage starts during NASA events, but we didn't realize how totally un-exaggerated those stories actually were. At the very first special stage, everybody just sat and waited for nearly an hour because the emergency crews weren't in place yet to be able to run the stage. We waited around a lot more than that at other stages, though one time was because two Evo X's went off badly enough on SS4 that the stage was canceled. In the end, we only ran 4 of the 9 planned stages. So...that was disappointing, but a good way to get familiar with rally again.
Day 2 was more interesting, though we still ended up with a stage cancellation due to delays. The stages were really exciting though, with some big air on the first two stages and some fast but fairly technical elements on the other three. There was a lot more waiting around too, which can be fun when used to socialize with our fellow rallyists, but not as cool when it causes a stage cancellation.
One of the most exciting stages was Goose Pond which is known for being pretty heavy on the jumps. It did not disappoint. At one point, we ended up so detached from the ground that we had no chance of correcting our trajectory and ended up shooting off toward the side of the road. Sean had the wherewithal to correct it though, and I didn't really understand the severity of the situation until I watched this video. Excuse the terrible camera placement that heavily overemphasizes the importance of the rear view mirror...
Crazy jumps at about 0:30
As much as I'm complaining about missing a stage though, we ended up being very lucky that the stage was canceled because our fuel gauge lied to us and we ran out of gas while on the transit back to service. If we had tried to run the final stage, we would have ended up with a DNF. Which would have sucked. Thanks to Michael Hall and Carl Lynn in the super badass Mitsu Mighty Max for flat towing us back to the finish of the rally.
The adventure wasn't over though, as when scores were posted, we were showing up as last place by a MASSIVE margin due to a one hour (!) penalty. The penalty notice said "At TC14B was due at 16:39:00 but arrived at 15:39:00." This was ridiculous because it meant that we traveled at least 30 minutes back in time during service, so I filled out an inquiry form to get that changed. I didn't really know how to state it, so I did it bluntly.
So we got our hour back and ended up finishing in 3rd place in Open 2WD Light, just a single second out of second place. I'm happy with it though.
The other thing is that this was Dmitriy's first rally in his new car and on the suspension that I built, so I was being paranoid and asking him about it after every stage. It seems to be holding together just great and Dmitriy has been saying that it's performing well, so that was a huge relief.
Thursday, September 22, 2011
Black River Stages - Day 0
Posted by
Kenneth
After a long-ish tow through Canada, we've arrived safely in some part of New York. I'll go look for it on a map now.
Thanks to Matt Bushore for towing us out in his pretty scary ambulance over such hazardous terrain as narrow-ish bridges and Toronto traffic. Some nice scenery though, especially over these "Thousand Islands."
There's a thousand of them! All apparently inhabited by rich people
Upon reaching our destination, we put some stickers on the car and got it through tech with minimal hassle. Then, we sat through a 3 hour long novice orientation which was surprisingly helpful and entertaining.
Tomorrow, we don't have to get to Parc Expose until 2 PM, so we have some time to sleep in and work on the car. Unfortunately, we discovered that our skidplate doesn't quite clear the new motor's oil pan and we have some loose relay connections that make our lights stop working. So luckily we have some time to fix these things and hopefully shop for some snacks. Yum.
Sean has mandated that everyone have fun, so...wheeee!!!
Saturday, September 17, 2011
Busy gap, Black River Stages in 1wk
Posted by
Sean Murphy
It lives! Tonight I drove the GTI, with the new-to-me 9A 2.0l and new-to-the-world body harness with way awesome switchpanel (and hopefully, improving from garbled stock wiring, way awesome reliability for all projects to come). This is cutting it very close considering that we need to pack up next Wednesday night, something which has been both a source of stress and motivation. (what if the new trans was bad or engine has fundamental damage which I didn't know about? etc - - but it is OK so far!)
See also the glimpse at the new gauges and switchpanel, and shove your face into the cat on that video...um, catalytic converter...displacing the muffler because the header displaced it! That thing REALLY trumpets under load, pretty smooth sounding at speed.
I think Kenneth and I have been putting ~20 hours a week into that car for the past three weeks, heh, or that's what it feels like. Because now it's go time: we're going to Black River Stages next week in Watertown NY. Matt Bushore will be towing us out with his terrifying ambulance rig, we're all signed up and paid, and the hotel doesn't know what's about to hit it (a lot of really tired people, that's what...)
Dmitriy, who's been our fearless crew chief, is returning to his permanent role - which is driver for his own car. We've been lucky to have him, but we're really excited to run with him on stage, especially with his sweeet new suspension, I don't know how we're going to keep up! (of course, see below post for Dmitriy's new suspension). But - we're very excited to have the intrepid Kyle Steinkamp with us again, he'll be our crew chief, and between him and Matt we'll be in good hands. My goal is to finish with no major damage to the car (or at least, due to driver error). I've gone through a rear suspension each rally so far, so at least, I want to finish with intact rear wheels...
Stay tuned, we'll have many updates, pictures and video in the next two weeks!
Wednesday, July 27, 2011
Rally Struts: Finally Finished!
Posted by
Kenneth
It's been a while since I've had any progress to show, mostly because the autocross season ramped up and suddenly I'm busy ALL the time. Dmitriy has been rapidly reassembling his car though, and I didn't want to be the last thing holding him up, so I've been pecking away at his suspension to finally get it done.
First, I decided that since I already got myself a big power supply for zinc plating, I might as well get the most out of it and get outfitted for anodizing so I could color and protect the aluminum spring perches. This mostly involved more buckets and a trip to NAPA Auto Parts for a couple gallons of battery acid. And making some room in the garage. After some trial and error, I got everything to turn blue with reasonable success. It took a while.
Next, I FINALLY got the housings back from powdercoater Bobby (my fault, not his). They turned out very nicely in blingy gold. Thanks Bobby! I don't really have pictures of the rest, but I machined the top pins of the strut inserts to fit Subaru GroupN top hats, pressed in the bushings and seals and assembled everything. Then I took some pictures!
Tuesday, July 5, 2011
GTI Engine In!
Posted by
Sean Murphy
With a little (lot) bit of help from our awesome crew member Kyle (who's now hired locally full time), the engine is in after patching all the unnecessary holes in the firewall and attaching the sweet 17 year-old stainless Superspring 4-2-1 header I found a couple months ago. Now I can finally return the engine hoist and stand I've been borrowing, (unfortunately their owner needs it, the crank may have walked in his 2.4L-swap neon daily driver) and get to the 'lighter' work of coolant lines, radiators, fuel injectors and installing Kenneth's harness. Once I get back from vacation, of course!
Side note - the halfshafts on the old trans were SO shot, with significant rotational play. The passenger's side inboard, with goes through a fair amount of travel with suspension movement, was misaligned and had dropped a ball into the housing. I couldn't believe it still worked. Add it to the list of things which miraculously held together to finish Sno-Drift all those months ago... Also, we found that the trans had eaten the end of the speedometer cable. So we've bolted up the spare trans, unknown history. We'll see how that goes. It's time to build one right, final drive and diff, so as long as this replacement one works we'll be happy for now.
Monday, June 20, 2011
Fundamental GTI progress
Posted by
Sean Murphy
OK, been a while, and been a good bit of work. The car body is now ready to be put back together after the door bar gussets are complete, interior final stripping done (radio antenna, rear wiper, sunroof and sunroof frame, and about 50 more unused circuits are now all gone), some minor subframe welding repair near the suspension pickups, and the strut tops are now converted to...Subaru. Along with the engine swap upcoming, this car will really never ever be legal for anything other than rally.
Engine out (kinda old news now):
HVAC brush-up: evaporator removal and swapping original air director and clogged heater core unit for cable-actuated Chery part (also found in mk3 I think)
Strut top, in pictures!
That little Hobart 140 makes the lights in the house flicker, but I'm amazed it could penetrate the 3/32 plate like it did...but there is no higher setting. Also, there's a lot of weave-beading to do with 0.030" wire, and short of the community-college welding class I'm enrolled in I'm no expert. But I'm happy and confident those plates aren't going anywhere. Heh, now to think about refilling the tiny 40cf tank I have, I'm half out of gas! Well, the welding getup including tank is small enough to bring to rally, and that's why I chose it.
So when I pulled the engine it was cold out. It's hot out now, and time to get this thing back together before my lease is up. Kenneth has a complete plan and a 4x8 sheet of pegboard, and is ordering parts for the wiring now (which is going to be a thing of beauty, that work alone makes the car a keeper). I'm sure he'll chime in soon. I've also set up the 2L with a new rear main seal, metal oil baffle, new oil pan and knock sensor. The engine's pretty beat-looking though, so maybe the stock install configuration is simply going to get it warm before another removal next year. Certainly after a rally or two we'll be going Megasquirt+EDIS and some sort of cam configuration. Probably a double-exhaust cam setup first (yes, that's a thing for VW's...), maybe a 288deg + custom header next. But let's not get ahead of ourselves. Now to rehab the CIS-E injectors!
Friday, May 27, 2011
Domain Name
Posted by
Kenneth
Ok, last post for today. For our tiny subscriber-ship, you might have noticed that when you came to our blog today, you were redirected to www.icengin.com. That's because we have a domain now, which looks better for vehicle decals than a blogspot address. You can change your bookmarks or whatever you use to keep track of our blog to point to the new address. Or you can not, because it'll always automatically redirect.
More Rally Strut Progress
Posted by
Kenneth
Project Starlet: Introduction
Posted by
Kenneth
Toward the beginning of 2010, after graduating from grad school, getting a job and moving to a house with a proper garage, I got hungry for a project car of my own. Turns out, I already have a project car; it's a 1983 RX-7 with a Ford 302 swap.
I started on this project waaaay back in 2004 with my good friend, Chris Szutu. It was the summer after our freshman year in college, and for some reason we thought it would be a good idea to get a project car even though we spend most of our lives about 2300 miles apart. We found a non-running RX-7 GSL (that's with 4-wheel disc brakes and LSD) for $300, which included two blown motors. The original not-very-fleshed-out plan was to rebuild one of the motors and get it running. Then maybe we'd sell it or...like I said, not much of a plan. We eventually found both engines to be completely useless as one had been ravaged by a broken apex seal and the other had warped housings due to an overheat.
We went back to school, leaving the car in Chris's parents' driveway, and somehow it remotely escalated into a V8 swap. We ended up as the proud owners of a hideous '88 Mustang GT convertible and proceeded to drop that engine into the RX-7 the next summer.
Wow, that thing is ugly.
This was basically the pinnacle of our automotive achievement
That was pretty cool, but just because it's in the car, doesn't mean the car runs. We were too daunted by wiring (and the spiders that live in the car's mirrors) to really tackle it seriously, and so it's really just been sitting. In Chris's parents' driveway. For...5 years now?
This post is titled something about my Starlet, so all this must seem pretty unrelated. Well, just over a year ago, Chris was trying to get the RX-7 out of his parents' driveway like any good son would, but he had no place to put it, so the plan was to ship it out to me. Due to some really shady shippers (partially a result of our own cheap-ass-ness), that fell through. So I had gotten all excited to have a cool project and then it just didn't happen, so I started looking for one.
My introduction to the Toyota Starlet was seeing a couple of really cool looking ones autocrossing in the Bay Area way back in 2002. Apparently, one of the better ones belonged to Tito Solis of Red Star Racing.
My Inspiration!
This thing has pushrods?!
Little did I know, Starlets don't look or act anything like that when they're stock. Not. Even. Close. But now that I was starting from scratch, I was determined to get one because they're unique, rear wheel drive and weigh about 1800 lbs. I started searching in earnest, finding that Starlets are ridiculously rare in the Midwest and clean examples are VERY expensive. I finally found a 1981 in Chicago that claimed to be rust-free, had new paint and a 2TC swap with dual Weber DCOE's. I don't know anything about old school Toyota motors or carburetors, so none of that mattered to me. I also made a really strong point to the seller that I was driving a long distance to get the car so I wanted to be reassured that the car wasn't a rustbucket. The lesson that I learned is that people are jerks, because the car is actually pretty rusty. It also ran like crap, so I drove it about 250 miles across Michigan at about 55 mph, with the exhaust backfiring violently if I ever broke that barrier.
This thing has pushrods?!
Since getting it into my garage almost exactly a year ago now, the car has run a few times just to get it positioned in various directions in the garage so I can cut out the MASSIVE amounts of rust on the car and repair them. So far, I've replaced large chunks of both rockers, both front frame rails where they come under the front floor, and most of the floor.
The floor looks suspiciously like my garage floor...Much better
Once I get the passenger's side floorpan buttoned up, I should be done with most of the rust repair, with only minor stuff up front that is neither structural nor visible. Then, following Dmitriy's lead, I'll probably get the thing up on a tiptisserie to strip and paint the bottom.
What, you don't know what a tiptisserie is?
I'm moving soon though, so I have to wait until I have my new garage setup before I can pull the motor and suspension to allow it to be supported sideways by plywood.
SO, the long-term plan is something like this:
1. Make car not rusty: Getting there...
2. Engine swap: Current plan is 2.3L Duratec/MZR with turbo + NC MX-5 6-speed. Maybe 240 whp?
3. Full custom front suspension: Decouple sway bar from suspension location, Koni 8611's, really really low
4. Full custom rear suspension: RX-7 rear axle and custom 3-link + panhard or watts link, more Koni dampers
5. Big wheels and tires: It came with 155/80/13's (!), but I have it sitting on 225/45/15's right now. It seems appropriate, but maybe a 275 Hoosier is in its future
6. Race it wherever it fits: One thing that sucks about this car is that it will not fit nicely in any ruleset that I know of. That's ok with me for now though, I'm just having fun building it!
SO, the long-term plan is something like this:
1. Make car not rusty: Getting there...
2. Engine swap: Current plan is 2.3L Duratec/MZR with turbo + NC MX-5 6-speed. Maybe 240 whp?
3. Full custom front suspension: Decouple sway bar from suspension location, Koni 8611's, really really low
4. Full custom rear suspension: RX-7 rear axle and custom 3-link + panhard or watts link, more Koni dampers
5. Big wheels and tires: It came with 155/80/13's (!), but I have it sitting on 225/45/15's right now. It seems appropriate, but maybe a 275 Hoosier is in its future
6. Race it wherever it fits: One thing that sucks about this car is that it will not fit nicely in any ruleset that I know of. That's ok with me for now though, I'm just having fun building it!
Subscribe to:
Posts (Atom)